5 Most Common Smartphone Repairs

We do all kinds of repairs.

In Sydney CBD Repair Centre, we fix all kinds of devices from smartphones (Android or iOS), tablets, smartwatches, to fitness wristbands. We curated to you the most common device repairs that we do in our shop in Sydney.

back cover glass replacement

Repair #5: Back Cover Glass Replacement

The back of the smartphone is oftentimes the most overlooked part of any device. But have you noticed that lately, these components are coming in glass material? In the early days of the smartphone, these are made out of good ol’ plastic. Now, if you drop your smartphone without a case, you’ll break the back cover. Sometimes, you can patch it with a case even if it’s too late but the beauty derived from these exotic glass material cannot be denied.

You also have to replace it if you still want to use wireless charging that only comes with an all glass smartphone.

battery replacement

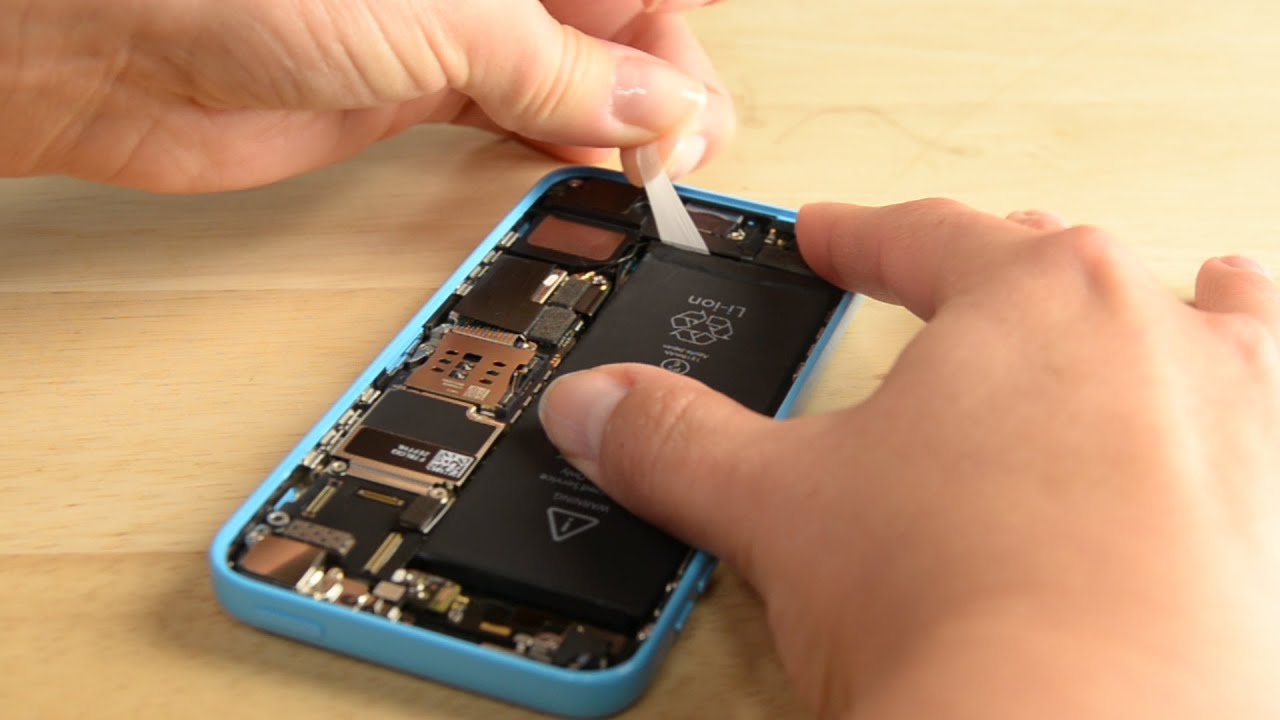
Repair #4: Battery Replacement

This repair are for those who owned their smartphones for a very long time. Oftentimes, people go into the shop with their well-used smartphone. It’s scratched up and had other repairs done to it. However, the battery is not cutting it anymore. Dying before sunset. That’s not good for a workhorse of a smartphone. You can’t rely on a battery that needs recharging every six hours. Oh, no no no. So customers come into the shop to revitalise their old device with a brand new lithium pack. This works all the time. Imagine an old companion having a renewed strength in life. Another productive year ahead just by installing a brand new power source. If that’s not practical, I don’t know what is.

charging port replacement

Repair #3: Charging Port Replacement

Here’s a tricky repair to diagnose but pretty easy to fix, a broken charging port. Believe me, this part of your smartphone can be worn out. How? The pulling out of the charger in an awkward angle or the plugging in of a contaminated charging cord? Yes, it can ruin this part and as a result, you can’t recharge your smartphone. Sounds bad? Certainly. But some people mistakenly take this problem as a battery issue or a dead motherboard. No. You just need to get rid of that faulty charging port out of your device, install a new assembly, and you’re good to go. Do you have problems like this? Maybe you just needed a charging port replacement right now.

camera outer glass replacement

Repair #2: Camera Outer Glass Replacement

You probably get the jist of this now. All glass parts of a smartphone are vulnerable to breakage. Yes, even the smallest glass portion – the camera glass. If you have a smartphone with a bump for the camera glass, then it can break when you drop the phone at a certain angle. If you have a smartphone with a huge camera patch at the back, it can break. If you have four cameras, then you better have a thick camera case to protect it from impact. The good news is, this is the easiest part to replace. No need to disassemble the entire phone. Just remove the broken glass, pop in a new one and viola, you have a fixed camera outer glass.

screen replacement

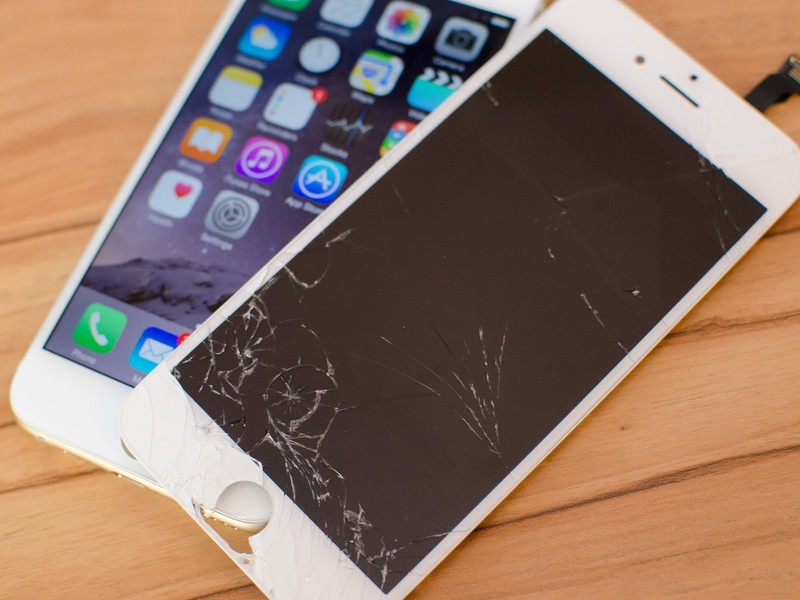
Repair #1: Screen Replacement


https://is.gd/A9MMCZ

❤ How to Convert a Numbers File to CSV on Mac

Convert Numbers to CSV on Mac


If you need to convert a Numbers spreadsheet file to CSV format from a Mac, you can do so quickly with the Numbers app. CSV stands for Comma Separated Values and is broadly used by many spreadsheet, database, and data storage uses, whereas Numbers is a spreadsheet app that is exclusive to the Mac and iOS platforms. Accordingly, there are many reasons why it may be necessary to convert a Numbers file to a CSV.

We’ll show you how to quickly convert a Numbers spreadsheet file into a CSV file for use where necessary.


This process requires the free Numbers app on the Mac. If you don’t have it on the Mac for whatever reason, you can download Numbers to the Mac from the Mac App Store from here.

How to Convert Numbers File to Excel File on Mac


  • Open the Numbers file that needs conversion to CSV format into the Numbers app/li>
  • Pull down the “File” menu and then select “Export To” and choose “CSV”


How to convert a Numbers spreadsheet to CSV on Mac


  • At the “Export Your Spreadsheet” screen, adjust any settings for the CSV file as needed including to CSV file encoding, then click on “Next”
  • Enter a name for the CSV file and choose a save location, then choose “Export” to complete the conversion from Numbers to CSV

The converted CSV file will be available right away at the destination you chose, whether that’s on the local hard drive, an external disk, to iCloud, or elsewhere. You can then modify or share the CSV file however necessary.

You can always re-open a CSV file into the Numbers app if necessary, and then save it again as a CSV.

Remember that CSV is a more basic raw file format usually used by spreadsheets or databases, and so if you want fancy charts and stylized graphs you would probably not want to use the CSV format and instead opt for something like the native Numbers file format or an Excel file format. The Numbers app also allows you to easily convert a Numbers spreadsheet to an Excel file if that’s necessary. – https://is.gd/WCUBih

❤ How to Turn Off Apple News Notifications on Mac

How to turn off Apple News Notifications on Mac


Apple News sends notifications to the Mac by default, splashing a steady stream of “news” alerts across the desktop, onto the locked screen, and into Notification Center of MacOS. If you don’t want to see these frequent Apple News notifications on the Mac, you can disable them completely for the News app.

How to Disable Apple News Notifications on Mac

  • Go to the  Apple menu in the upper left corner of the screen, and choose “System Preferences”
  • Select “Notifications” to access the Notification Center preferences on the Mac
  • Locate “News” from the list of apps sending notifications, and choose “None” as the News alert style


How to turn off Apple News Notifications on Mac


  • Exit System Preferences as usual

After you have chosen “None” as the alert type for Apple News Notifications, you will no longer receive any of these on the Mac.


Apple News Notifications on Mac


Many apps default to sending alerts and Notifications on the Mac, and Apple News is no different in this regard. Constant notifications can be very distracting if not annoying, and is part of why I personally have Do Not Disturb mode on the Mac enabled constantly so that I can help to maintain focus at my workstation. If you feel like you’re constantly dismissing notifications on the Mac, enabling perpetual Do Not Disturb mode 24/7/365 effectively disables Notification Center and is a great solution to regain some sanity, or recall that you can temporarily disable Notification Center by Option+Clicking on the Notifications icon in the Mac menu bar. If you have no use for Notificaion center at all, a more extreme option is to completely disable it and remove the menu bar item by unloading the associated kernel module, though that is really only appropriate for the most advanced Mac users.

Of course it’s not just the Mac that gets inundated with constant alerts and notifications, iOS does too. You might also appreciate knowing that you can disable Apple News alerts and notifications on iPad and iPhone too, if you find them to be distracting or annoying there as well, and likewise the iPhone and iPad can schedule Do Not Disturb in iOS or place it into perpetuity for some mobile focus and peace and quiet.

Whether you like Apple News notifications on the Mac or not is entirely a matter of personal preference. Undoubtedly some users enjoy the feature and the frequent notifications, and thus would not want to disable the alerts coming from the app. But if you find notifications to generally be distracting, then disabling them for the News app (and others) can offer an easy solution to improve such a situation. – https://is.gd/LUmdbT

❤ How to Change Mouse & Trackpad Speed on Mac

How to change the tracking speed on Mac of Trackpad or Mouse


Want to change the tracking speed of the cursor on a Mac? Maybe you want your mouse to move around on the screen faster? Perhaps you want the Mac trackpad to move the cursor slower?

You can manually change the tracking speed of either a mouse or trackpad connected to a Mac, and you can even have different tracking speeds for a mouse as you do for a trackpad, a handy trick for users who have both input methods in use on their Mac.

How to Change Tracking Speed of Mouse / Trackpad Cursor on Mac

  • Go to the  Apple menu in the upper left corner of the display
  • Choose “System Preferences”
  • Select “Trackpad” or “Mouse”, depending on which you have or want to adjust the cursor tracking speed for
      • For changing Trackpad tracking speed: Under the “Point & Click” section, look for “Tracking speed” and adjust the slider on the scale from “Slow” to “Fast” as preferred, the tracking speed changes immediately so you can test the change right away

How to change the Trackpad tracking speed on Mac

      • For changing Mouse tracking speed: Adjust the “Tracking speed” slider on the scale from “Slow” to “Fast” as desired

How to change the mouse tracking speed on Mac

  • Close out of System Preferences when finished

What tracking speed you use is almost entirely a matter of personal preference. Some users really like a fast tracking speed, while others prefer a slow speed. You should try out different settings and see which works best for you. Often you’ll find somewhere in the middle of the tracking speed slider options offers a good compromise.

Remember you can change the tracking speed of the cursor for input devices independently from one another. For example, you could have the internal trackpad of a MacBook Pro set to fast tracking speed, but any connected mouse could have a slow tracking speed, or vice versa. To independently change the cursor speeds of different input devices, just connect each input device to the Mac and then go to the “Mouse” settings and then the “Trackpad” settings and adjust each as needed. (Side note; you can also independently control mouse and trackpad acceleration speeds with a third party tool, but that’s a different topic)

Note a separate preference setting exists so that you can also change the scrolling speed of a mouse or trackpad on the Mac, which applies to either gestures for scrolling or to scroll wheels.

Some related helpful tips may be changing the size of the Mac cursor, and if you notice the cursor randomly getting big when you move the mouse or trackpad suddenly and you don’t like that, then you might want to disable Shake To Find on the Mac. – https://is.gd/N3KEnB

❤ How to Delete a Virtual Machine in Parallels on Mac or Windows

How to delete a virtual machine from Parallels


Need to delete a virtual machine from Parallels or Parallels Desktop Lite? Removing a virtual machine can be necessary when you’re finished using a particular environment, operating system, or VM for any reason, and it’s also common to remove unneeded virtual machines to free up disk space.

Here’s how you can easily delete a virtual machine in Parallels and remove it from the Mac (or Windows PC).

How to Remove Virtual Machines in Parallels & Parallels Desktop Lite

  • Launch Parallels or Parallels Desktop Lite, but do not start any virtual machine
  • Select the virtual machine you want to delete from the Control Center (if Parallels launches immediately into a VM, exit the VM and go to the main screen first)
  • Go to the “File” menu and choose “Remove”, or alternatively right-click on the VM and choose “Remove”


How to delete a virtual machine in Parallels or Parallels Desktop Lite


  • Select “Move to Trash” to delete the virtual machine without saving anything, or choose “Keep Files” to be able to use the VM again in the future if needed
  • Repeat with other virtual machines you want to delete


Delete the virtual machine in Parallels


  • Now go to the Finder and empty the Trash as usual (or right-click the Trash icon in the Mac Dock and choose “Empty Trash”)


Empty the Trash to delete the virtual machine from the Mac


Emptying the Trash is necessary to actually delete the virtual machine from the Mac and free up disk space on the computer.

It doesn’t matter if you use the File menu or the right-click menu to delete the virtual machine, the steps are the same afterwards.


Delete a virtual machine from Parallels by right click


Note: if you’re deleting a virtual machine from Parallels on Windows, you empty the Recycle Bin instead of the Trash like on the Mac.

Note that if you simply move the virtual machine to the Trash but don’t empty the Trash on the Mac, that VM can be recovered anytime before the Trash is emptied by simply going to the Trash, locating the vm file (usually labeled as the OS with the file extension “.pvm” like ‘Debian Linux.pvm’) and adding that VM file back into Parallels.

Virtual machines offer a powerful way to test out and use other operating systems by running them in an application layer atop an existing operating system, and this capability is not limited to Parallels or Parallels Desktop Lite. You can use virtual machine software like VirtualBox or VMWare for running Windows 10, Windows 8, Windows 7, Windows 2000, NT, 98, 95, 3.11, Windows with older versions of Internet Explorer ranging from IE 7 to IE 9, Ubuntu Linux, ParrotSec Linux, or just about any other Linux distribution, BSD, a variety of versions of Mac OS and Mac OS X including MacOS Mojave and macOS Sierra, BeOS / HaikuOS, and many other operating systems too. And of course you can delete virtual machines from VirtualBox and VMWare too if needed.

https://is.gd/qk5d3l

❤ How to Turn Off “Hey Siri” on a Mac

How to turn off Hey Siri on Mac


If you’re using a Mac with Hey Siri voice activation enabled but you’d like to turn the voice listening feature off, you’ll find that it’s easy to selectively turn off Hey Siri while still leaving the usual Siri invocation methods enabled in MacOS.

How to Disable “Hey Siri” on Mac

  • Go to the  Apple menu and choose “System Preferences”
  • Select the “Siri” preference panel
  • Uncheck the box next to “Listen for Hey Siri” to turn off Hey Siri on Mac


How to turn off Hey Siri on Mac


  • Close System Preferences

Remember this is only turning off the “Hey Siri” voice activation method which is actively listening for the ‘Hey Siri’ voice command, it does not Disable Siri on the Mac completely.

Now you can say “Hey Siri” all you want near the Mac and it won’t activate the voice assistant. But you can continue to access Siri through keyboard shortcut, the menu bar item, Dock icon, Touch Bar, or any other Siri access method on the Mac. Another advantage to this is that you can use Type to Siri on the Mac for typing Siri commands and requests.

This is aimed for the official Mac Hey Siri method, which is limited generally to newer machines, but if you’re on an older Mac model which is using the alternative method for allowing Hey Siri in MacOS then you would have to turn off those specific settings instead.

As with all settings, you can reverse this at any time by choosing to enable Hey Siri again through the same preference panel in MacOS. If you do disable Hey Siri then turn it back on again later, you’ll have to go through the voice recognition setup process again, which is fairly quick and requires you to speak a few phrases to the computer.

Obviously this is aimed at Hey Siri for Mac, but anyone can turn off Hey Siri on iPhone or iPad too if they don’t want the voice activation feature on their iOS device either. – https://is.gd/lnsMmK

❤ What’s the Mac Equivalent to F5 Refresh Key from Windows?

The Mac F5 refresh equivalent from Windows is the Command R keyboard shortcut


Mac users who have switched from the Windows platform may be accustomed to hitting the F5 function key to refresh a web browser, web site, or webpage. The F5 key is used as refresh or reload in most Windows web browsers, so when Windows users switch to Mac they might be wondering what the equivalent refresh button is on the Mac, since hitting F5 on the Mac either usually adjusts keyboard backlighting or does nothing at all.

We’ll cover the F5 key equivalent on the Mac for most web browsers that you’ll encounter, so if you’re a recent Windows switcher you should find this guide particularly helpful.

Command + R is the Refresh Keyboard Shortcut on Mac Web Browsers, Usually

The keystroke for reloading or refreshing a webpage on most web browsers for the Mac is Command + R, and that applies to the majority of Mac web browsers, including Safari, Chrome, Firefox, Opera, Epic, Brave, and others.


How to refresh webpage on Mac with F5 equivalent Command R


We’ll dive into specific web browsers next to discuss each individually and also some specific tricks for each to reload without cache, if that’s necessary.

F5 Refresh Equivalent in Safari for Mac

Safari is the default web browser on a Mac, so it’s probably what you’ll be using by default unless you change the default browser, so this is probably the most important to cover first. To refresh or reload a webpage in the Safari web browser on a Mac, you press a simple keyboard shortcut combination:

  • Command + R reloads a webpage in Safari on Mac

Command + R in Safari for Mac reloads a webpage, making it essentially the same thing as hitting F5 on Windows when viewing a webpage.

Using Command+R to refresh in Safari works the same in the standard Safari version that comes preinstalled on all Macs, along with Safari Technology Preview and the developer version too. It’s one simple keyboard shortcut; Command + R is the Safari equivalent to F5 in a Windows browser.

Note that if you want to refresh a webpage in Safari without loading cache, you can use Command+Option+R, or hold down the Shift key and then click the refresh button, or you can empty the Safari cache. Reloading web sites without cache is typically for advanced users and developers only.

F5 Refresh Equivalent in Chrome for Mac

Reloading a webpage in Chrome on the Mac uses the same keyboard shortcut combination as does Safari on the Mac, cmd+r. This includes Chrome, Chrome Canary, and other Chrome dev versions.

  • Command + R reloads a webpage in Chrome on the Mac

Indeed Chrome on the Mac also uses Command + R to refresh a web page or website, which is the exact same reload keyboard shortcut that Safari uses. This obviously makes it easy to remember, since you only have to remember one keyboard shortcut for reloading.epic

You can also add the Shift key to that same keyboard command to force refresh a webpage without loading cache in Chrome, but that’s typically used by developers and most users won’t need to do that.

Refreshing Webpages in Chrome Derivative Browsers; Epic, Brave, etc – Command+R

A handful of other browsers use Chrome as their basis, including Epic, which has a handy geolocation proxy tool, Brave, and others. All of these Chrome spin-off browsers also use Command + R to refresh the browser.

F5 Equivalent in Firefox for Mac

Are you a Firefox user on the Mac? Great, the Firefox refresh keyboard shortcut is the same as the other browsers yet again!

  • Command + R will refresh a web site in Firefox in Mac OS

You might be noticing a recurring theme here… much like F5 is the default refresh browser and webpage option on Windows computers, Command+R is the default refresh option on Mac web browsers.

F5 Equivalent in Opera for Mac

If you use Opera (which has an excellent free bundled VPN and is therefore a worthwhile browser to add to some users collections for that reason alone), then you’ll be relieved to know that Opera also uses the same keyboard shortcut as other Mac browsers for refreshing webpages:

  • Command + R refreshes a webpage in Opera for Mac

As you probably noticed by now, basically regardless of the web browser itself, the Command+R keyboard shortcut for reloading a webpage on the Mac is so ubiquitous and widely adopted that there isn’t a single variation that moves away from that. So much like F5 refreshes web pages on Windows, Command+R refreshes web pages on the Mac, making Command+R the F5 equivalent.

What about refreshing in other apps?

Many other apps have refresh functions as well, but not all of them have keyboard shortcuts associated with their functionality. For example, you can refresh the Mac App Store with Command+R as well, but you if you want to refresh Finder file system you’ll have to try something different as there is no direct refresh option.

This is just one of many useful things to learn and remember for Windows switchers to the Mac platform. Some other helpful tricks can be learning what the HOME and END buttons are, what Page Up and Page Down are, the Print Screen button equivalent, what the ALT key is (if it’s not labeled, depends on the keyboard and region of the Mac), and mimicking the DEL forward delete function. All of these are possible (and so much more) on the Mac, but because most Mac keyboards are a bit more minimalist and simplified, it can require some minimal adjustment to get acquainted with the new keystrokes and keyboard shortcuts to accomplish tasks that may have been routine habit in the Windows PC world. – https://is.gd/3FqD7k

❤ How to Enable Auto Update for MacOS System Software

How to enable automatic MacOS system software updates


Have you ever wished your Mac would update MacOS system software on its own? If you’d like to take a hands-off approach to updating your system, you can enable automatic MacOS system software updates. With this feature enabled, not only will your Mac automatically check for new system software updates, but it will download and then automatically install the macOS updates too.

Enabling automatic MacOS software updates is great for convenience, but it’s really only recommended if you also have setup Time Machine for regular Mac backups, which are also automated once that setup has been complete. Without regular backups, there is a chance that an automatic update could go awry and lead to hassle or data loss, thus if you are considering using automatic macOS updates then it is important to use Time Machine for backups too.

How to Enable Automatic MacOS System Software Updating

Want a Mac to automatically update system software itself? Here is how you can enable that:

    1. Go to the  Apple menu and choose “System Preferences”
    2. Select the “Software Update” preference panel, then choose either of the following options:
      • To automatically update both MacOS system software and Mac App Store apps, check the box for “Automatically keep my Mac up to date”

How to enable automatic MacOS updates

      • To only auto-update MacOS updates to system software and security updates, click the “Advanced” button then check the boxes for: “Check for updates”, “Download new updates when available”, “Install macOS updates” and “Install system data files and security updates” *

How to enable automatic MacOS system software updates

  1. Exit out of System Preferences when finished

Once you have automatic MacOS updates available, the Mac will periodically check for any available system software update, and if one is found it will download and install it automatically. This process tends to happen in the middle of the night if the Mac is left on, otherwise it aims to happen when the computer is not in use.

You can still manually check for MacOS software updates with this setting enabled if desired, though the necessity for doing so is diminished since this sets the process to be automated.

* The option for “Install app updates from the App Store” can be enabled here as well if you want Mac OS to automatically update your Mac App Store applications as well. That setting can also be enabled or adjusted through the Mac App Store settings directly. We’re focusing on enabling automatic system software updates to MacOS here, however.

To be clear, auto system updates is not a new feature, though it is different now in MacOS 10.14 onward compared to prior releases. Much like the process of updating MacOS system software manually is different in macOS Mojave 10.14 onward compared to prior versions of Mac OS X, the setup for enabling automatic MacOS software updates is different now too compared to auto-update in prior Mac OS X versions too. This is largely because system software updates no longer come through the Mac App Store, but instead through the System Preferences again. So if you’re reading this article and wishing you had the feature on your Mac with an earlier MacOS release, you probably do, it’s just in a different settings location.

Obviously a feature like this requires internet access, so if the Mac is not on the internet then automatic updates will not work.

Whether or not you want to use this feature likely depends on how you use a Mac, how often you backup, if you prefer a hands-on approach to maintenance, whether you install updates through System Preferences or by using Combo Updates, and other personal preferences. Like other settings, you can always disable this feature later if you decide to. – https://is.gd/TkhF7O

❤ How to Change Siri Voice on Mac to Different Gender or Accent

How to change Siri voice on Mac


Want to change the voice of Siri on a Mac? There are numerous voice options for Siri available, and on the Mac you can change the voice of Siri to be male or female, and you can even change Siri’s accent too.

Siri must be enabled for this to work, so if you turned it off you would need to turn it back on again in Siri settings. Any change made to the Siri voice, gender, or accent will apply to all Siri interaction on the Mac, so whether you summon Siri through the Dock, menu bar, keyboard shortcut, using Hey Siri, or the Touch Bar, does not matter, the voice change will apply universally.

How to Change Siri Voice on Mac to Different Accent or Gender


  • Go to the  Apple menu and choose “System Preferences”
  • Choose “Siri”
  • Pull down the dropdown menu next to ‘Siri Voice’


How to change Siri voice on Mac


  • Select one of the Siri voice options:
    • American (Female)
    • American (Male
    • Australian (Female)
    • Australian (Male)
    • British (Female)
    • British (Male)
    • Irish (Female)
    • Irish (Male)
    • South African (Female)
    • South African (Male)


Siri voice gender and accent options on Mac


  • Summon Siri to test out Siri to confirm the voice change has taken effect

Regardless of what Siri voice you choose, the Mac Siri commands available remain the same, even the goofy ones.

The Siri voice options discussed here are obviously for English speaking users, and thus they might be different for other languages and regions of the world, and depending on what language is set on the Mac.

Changing Siri voice gender is a nice and simple way to customize the Siri experience, and whether or not you prefer the Male Siri voice or the Female Siri voice is largely a matter of personal preference.

You’ll find that changing the Siri accent can offer a fun way to personalize Siri, and even if you’re not from a particular region it can be pleasant to engage with Siri using a different accent. Do note that some subtle inflections may be different and so if you’re not familiar with a particular accent it may not be the best experience to use a different one.

Whatever Siri voice you choose will impact all ways of interacting with Siri when Siri speaks, including both Hey Siri and regular Siri.

This obviously applies to Siri for the Mac, but you can also change Siri voice in iOS too for iPhone and iPad users.

Change the Siri Voice gender

Change the Siri voice accent – https://is.gd/c3e0Iv

❤ How to Stop Typing Periods Automatically with Double-Space on MacOS

How to stop Mac typing periods automatically


The default keyboard settings on modern Mac OS versions include a shortcut for typing periods quickly. This means that hitting the spacebar twice will insert a period automatically at the end of a sentence or word.

Automatically typing periods comes to the Mac from the iPhone and iPad world, and while some the period typing shortcut can be desirable for some Mac users, others may not like it as much. If you do not like the automatic period typing keyboard shortcut on the Mac, you can turn this feature off.

How to Disable Auto Period Typing Shortcut on Mac

  • Go to the  Apple menu and choose ‘System Preferences’
  • Select the “Keyboard” preference panel, then choose the “Text” tab
  • Locate the setting for “Add period with double-space” and toggle the checkbox to the OFF position


How to stop inserting periods automatically on Mac keyboard


  • Exit System Preferences


Now when you hit the space bar twice, or type a double-space, a period will no longer be inserted automatically. Instead, to type a period you must manually hit the period key on the Mac keyboard.

For some Mac users this is entirely a matter of personal preference, but there are situations where this period typing shortcut can be problematic. For example, if a Mac keyboard is double-typing spaces at random, you may find that periods are being inserted erroneously while typing and where you don’t want them to be placed. Turning this setting off can resolve that situation.

This obviously applies to the Mac, but the period shortcut setting also exists in the iOS world, where you can turn off the automatic period typing on iPhone and iPad too.

The double-space period shortcut setting is the default on new macOS versions and with new Macs, but some users may have made the change manually to enable automatic word capitalization at the start of a new sentence, and inserting periods after double-spacing. Whether you like this setting on or off is going to be up to the user and how they type, and like all system settings you can easily change it again at any time. – https://is.gd/HM4ZfU