❤ How to Get “Hey Siri” on Unsupported Macs

Get Hey Siri on unsupported Macs


Have an older Mac but want Hey Siri voice commands? With a little effort, you can get ‘Hey Siri’ on unsupported Macs by using a creative workaround. While new Mac models can enable Hey Siri on the Mac as easily as checking a setting in system preferences, older Macs do not support the same Hey Siri feature. This tutorial will show you how you can replicate the exact same “Hey Siri” capability on any Mac that does not support Hey Siri by default, as long as it has regular Siri functionality.

This has been tested and confirmed to work on Macs that have Siri and without official Hey Siri support. This includes Macs running macOS Mojave, High Sierra, and Sierra, as long as Siri is enabled on the Mac you will be able to use this workaround approach to mimic Hey Siri functionality. You will need a microphone, and the Mac must have Siri support. The rest is just a matter of configuring the Mac to listen for a special command and then tie that command to Siri to replicate Hey Siri hands-free voice commands on a Mac.

How to Enable “Hey Siri” on Unsupported Macs

This is a multiple-step process to setup Hey Siri on an unsupported Mac, follow the steps carefully:

  • Go to  Apple menu and choose “System Preferences”
  • Choose “Siri” preference panel and make sure Siri is enabled


How to get Hey Siri on unsupported Mac


  • Now go to the “Keyboard” preference panel and to the “Dictation” tab and check the box for “Dictation” to ON and then check “Use Enhanced Dictation” as well


How to get Hey Siri on unsupported Macs


  • Next go to the “Accessibility” system preference panel and choose ‘Dictation’ from the sidebar, and check the box for “Enable dictation keyword phrase” and type in ‘Hey’ * and then click the “Dictation Commands” button


How to get Hey Siri on unsupported Mac


  • Check the box for “Use advanced commands” then click the + plus button


How to get Hey Siri on unsupported Mac


  • Configure the advanced Dictation command as follows:
    • When I say: “Siri”
    • While using: “Any Application”
    • Perform: Run Workflow -> Other -> Navigate to /Applications folder and select “Siri.app”


Enabling Hey Siri on unsupported Mac

  • The configuration should look like the following, with the Perform action being “Open Siri.app”, if everything matches choose “Done”


How to get Hey Siri on unsupported Mac

  • Confirm that the “Hey Siri” trick is working by saying “Hey Siri what’s the weather” or some other Siri command


Testing Hey Siri voice command on unsupported Mac

Assuming you configured things as described above, you will now have a fully functioning “Hey Siri” hands-free voice commanded assistant on a Mac, even if that Mac does not officially support Hey Siri.

Try it out yourself, it works! The response time and accuracy seems about the same as official Hey Siri on the Mac.

Using Hey Siri on unsupported Mac

Basically anything from the Mac Siri commands list will work when activated through voice this way.

Hey Siri working on Mac saying sorry

* You can use any other dictation keyword phrase, we’re using “Hey” so that we can mimic the “Hey Siri” feature. But you can use “Open the pod bay doors Hal” or something else if you feel like it.

How to Turn Off the Hey Siri Workaround on Older Macs

If you want to turn this off, you can return to the Accessibility Dictation section and uncheck the various boxes. If you want to disable Enhanced Dictation and disable Siri in general you can do that too. You may have noticed that Enhanced Dictation downloads a 1.2gb package for it to work, but you can remove Enhanced Dictation to reclaim that disk space on the Macif desired.

While this is obviously for the Mac, enabling Hey Siri on iPhone or iPad is easy and supports many devices, and you can enable Hey Siri on Apple Watch too. Whichever device you use Siri on you can use many Siri commands from the list and yes even the funny Siri commands that are just plain goofy. – https://is.gd/FVxxbg

❤ How to Install Intel Power Gadget on MacOS Mojave

Intel Power GADGET on Mac


Intel Power Gadget for Mac is a processor monitoring tool that allows computer users to monitor the performance of an Intel processor in real-time. Intel Power Gadget will show you power and energy information in watts, the clock speed frequency of the CPU in GHz, the temperature of the CPU, and CPU utilization. It’s a handy utility for many reasons, and some Mac users may even use it as an alternative system monitor sort of like Activity Monitor.

Newer versions of MacOS can sometimes have trouble installing Intel Power Gadget, and many MacOS Mojave users have discovered the installation fails or the app doesn’t work. This installation failure is usually due to a default security setting in MacOS, and is easy to resolve.

How to Install Intel Power Gadget on MacOS

Installing Intel Power Gadget on the Mac is easy, though you may run into a Gatekeeper security block that can cause installation trouble. Here’s how to successfully install the tool in modern macOS releases:

  • Download Intel Power Gadget from Intel.com for Mac, it’s free (also available for Windows)
  • Launch the “Install Intel Power Gadget.pkg” from the mounted disk image as usual and start the installation process
  • If you see a ‘System Extension Blocked’ message, click on “Open Security Preferences”, otherwise go to the  Apple menu and choose ‘System Preferences’ followed by ‘Security’


Install Intel Power Gadget on Mac


  • Under the ‘General’ section of the Security preference panel, click the button to “Allow” the ‘system software from developer Intel corporation apps’ which was blocked by Gatekeeper *


Allow the Installation of Intel Power Gadget on Mac


  • The Intel Power Gadget installer should proceed as usual and successfully install, if it fails then just run the “Install Intel Power Gadget.pkg” package installer again


  • When finished, launch Intel Power Gadget from the /Applications folder as usual


Intel Power Gadget running on Mac


If you run Intel Power Gadget while you’re using the Mac, you may notice that processor performance can change around quite a bit depending on what you’re doing and what sort of apps you’re using.


Intel Power Gadget running alongside web browser and Terminal window


It is completely normal for the processor charts to be changing constantly, and you’ll find that the processor clock speed may go up or down, as will both CPU temperature and power, typically correlated with processor utilization – this makes sense as more processing utilization requires more power to have a higher clock speed, which raises the temperature of the CPU, and of course the opposite can happen as well with CPU speed lowering along with lower power and lower temperature and utilization when the Mac is less busy. If you’re interested in doing so, you can see this directly and test it yourself by running any CPU intensive task, like the Terminal command ‘yes’, which is often used for stress testing a Mac (or any Linux PC):


Running the yes stress test as Intel Power Gadget watches CPU


As you can see the graphs for power, frequency, temperature, and utilization suddenly shoot way up as the ‘yes’ command runs in the adjacent Terminal window as a stress test, which is normal and expected behavior for the processor.

Uninstalling Intel Power Gadget on Mac

Decide you don’t need Intel Power Gadget? Uninstalling Intel Power Gadget is quite simple. Simply navigate to the /Applications folder and open the Intel Power Gadget directory, then run the included ‘Uninstaller.pkg’ package file. This will remove the Intel Power Gadget application and the associated kernel extension from the Mac.

* If you’re a truly advanced Mac user and you’re bothered by these type of security measures causing installation issues, you can choose to allow apps from anywhere in macOS by disabling Gatekeeper, though that is strongly not recommended for the vast majority of Mac users. There are quite a few apps that can fail to install because of the stricter security standards that are in place in modern macOS releases, and if you’re the type of person running Intel Power Gadget then you may encounter also a similar issue with installing VirtualBox in MacOS where the kernel driver fails to install, thereby preventing that app to work as well. Typically you can bypass Gatekeeper on a one-off basis as discussed here, which is arguably the best approach, but you can also just turn it off completely if needed. – https://is.gd/akJ2Cd

❤ 5 reasons why you should upgrade to macOS Mojave right now

macos mojave home app

Version 10.14 of the macOS is here.


Today’s the day, Mac users: the latest version of macOS, called Mojave (and officially it’s version 10.14), is now available. It’s not a major revamp of the operating system (it’s been a while since the Mac has had one of those), but it does add new features that can help you be more productive with your Mac.

That being said, you may be hesitant to upgrade. After all, what you’re using now works fine, and why risk the potential for problems? We hear you, and if you don’t want to upgrade right away, you’ll be fine. But in case you’re on the fence, here are a few reasons why you should upgrade to macOS Mojave now.


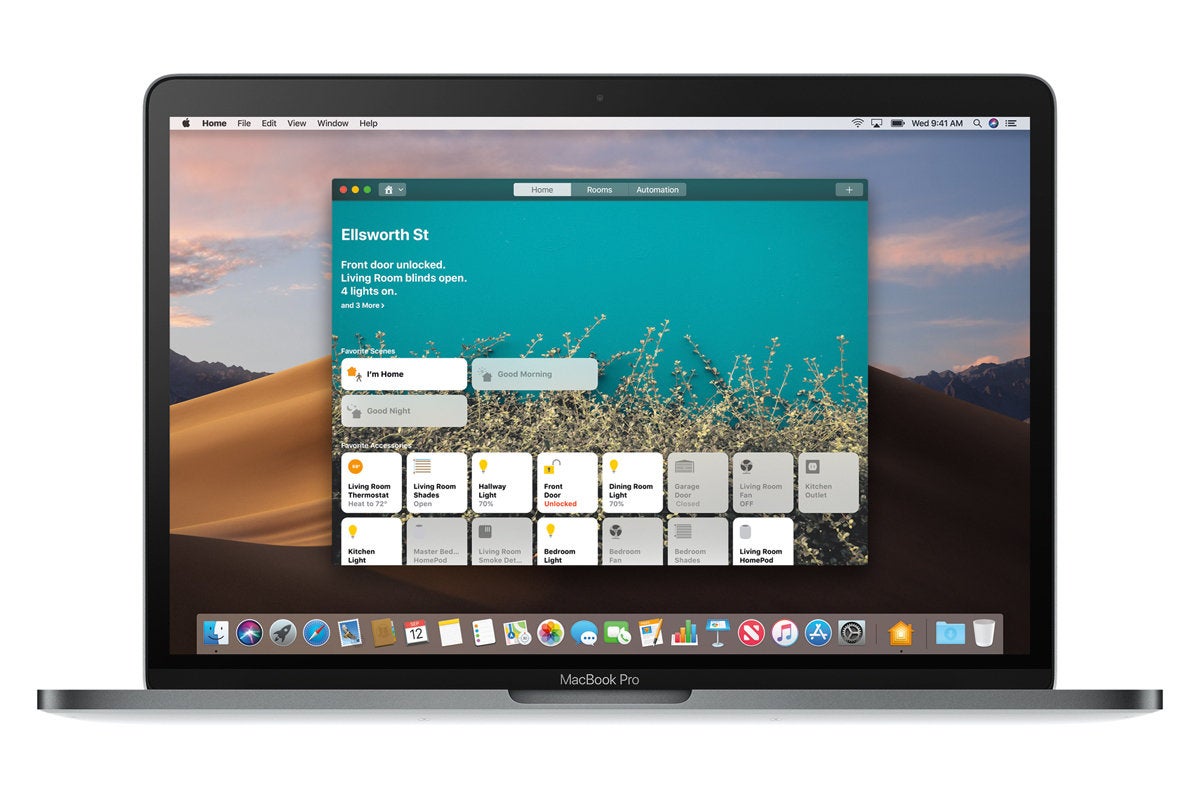
MacOS Mojave Dark Mode is easier on the eyes


The first new feature Apple discussed at the 2018 Worldwide Developers Conference unveiling of Mojave, the first feature that the Mojave website highlights, and the first feature I’m covering here is Dark Mode, which uses darker colors for user interface elements like the toolbar and menus. Being first implies a sense of importance, but to some, Dark Mode may seem like an odd feature to highlight first. “Yeah, so the Mac uses dark stuff. So what?”

Think about how you use your Mac (or computers in general). When you’re looking at a computer screen, you’re basically staring at a light source. And if you’re like me, you do almost all of your work all day long while staring at this light source. With a traditional Mac UI, you’re usually using windows that are predominating bright white, and staring at the light for a while can cause eye fatigue.


light mode window mojave

A familiar Light Mode window in. macOS Mojave…


dark mode window mojave

…and a new Dark Mode window.


Dark Mode feels a lot more comfortable to me, though I don’t feel more or less fatigued at the end of the day. (That’s probably due to the fact that I make it a point to take quick “vision” breaks every 30 minutes or so.) Some people think Dark Mode helps you focus on what you’re working on; I can’t say I agree or disagree, I don’t notice a difference in where my attention is at. But while I’m working, being in Dark Mode feels more pleasing, and I now have a preference for it. I’m also looking forward to more apps offering Dark Mode interfaces.


MacOS Mojave Continuity Camera


Before Continuity Camera, it took a bit of effort to get a photo or scan on to your Mac. With Continuity Camera, the process is a lot more efficient.


macos notes scan iphone

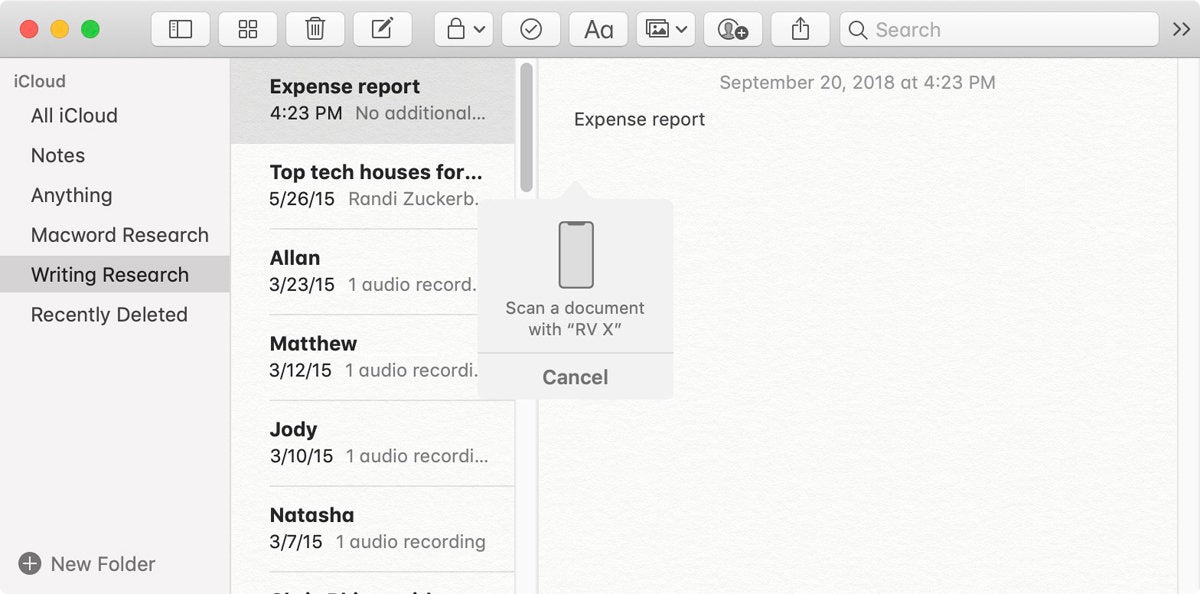
You can scan images directly into Notes.


In apps that support the feature, all you need to do is click in the area where you want your image to appear, and then go to the File menu and look for an option to import a scan or photo from your iPhone or iPad. Select it, and an indicator appear in your Mac app and your iOS device’s camera automatically launches. You can then snap a pic or “scan” your document, and the result is automatically inserted in your document. So easy. Unfortunately, this feature doesn’t allow you to select a pic that’s already on your iOS device for placement in your document, but maybe that’s for a future update.

Continuity Camera works right now with Mojave’s bundled apps, like Notes, Mail, Messages, and in the Finder. It also works with Apple’s Numbers, Pages, and Keynote. Look for third-parties to add this functionality soon.


Using an iPhone X to scan a receipt in Notes for Mac.


MacOS Mojave improved security features


Security isn’t a glamorous topic, but there are a few now security features that make Mojave an attractive upgrade.

Because of what I do for a living, I’m often downloading and trying new software, sometimes from developers with whom I’m not familiar. So I run a few utilities to keep an eye on what’s going on with my Mac. One of the utilities I use is OverSight, which flashes an alert any time an app wants to access the Mac’s FaceTime camera and microphone.


macOS Mojave now lets you know if apps are trying to access your Mac’s microphone, camera, and other items.


An OverSight-like feature is now built into Mojave that can alert you when an app wants to accessalong the camera and mic, as well as iTunes device backups, Time Machine backups, your Mail database, your Message history, your Safari data, and other data.

Even better is that Safari in Mojave has improved Intelligent Tracking Prevention. What this does is that it blocks attempts to track the websites that you visit. If you trigger one of these tracks (often by clicking on a comment button, or when you Like something on Facebook), Safari posts an alert to let you know that you need to allow tracking to continue on.

Mojave also has more features for managing password, such as the ability to create strong passwords, the ability to automatically enter in a security code that you get vis SMS, and password auditing. These are great features, but as a longtime 1Password user, I don’t think I’ll be giving it up for Mojave’s built-in features. I prefer 1Password’s management tools, even though it means I’m not being efficient about my password usage.


MacOS Mojave Quick Look for quick image edits


As the family documentarian, it’s my job to take pictures and videos of family events. But I don’t just shoot and then file away the results; I look at the pics and videos and edit them. Usually, they’re easy edits, but it feels like a hassle to preview a file to see if it needs to be edited, and then open those files that do in an app.


mojave quick look quick tools

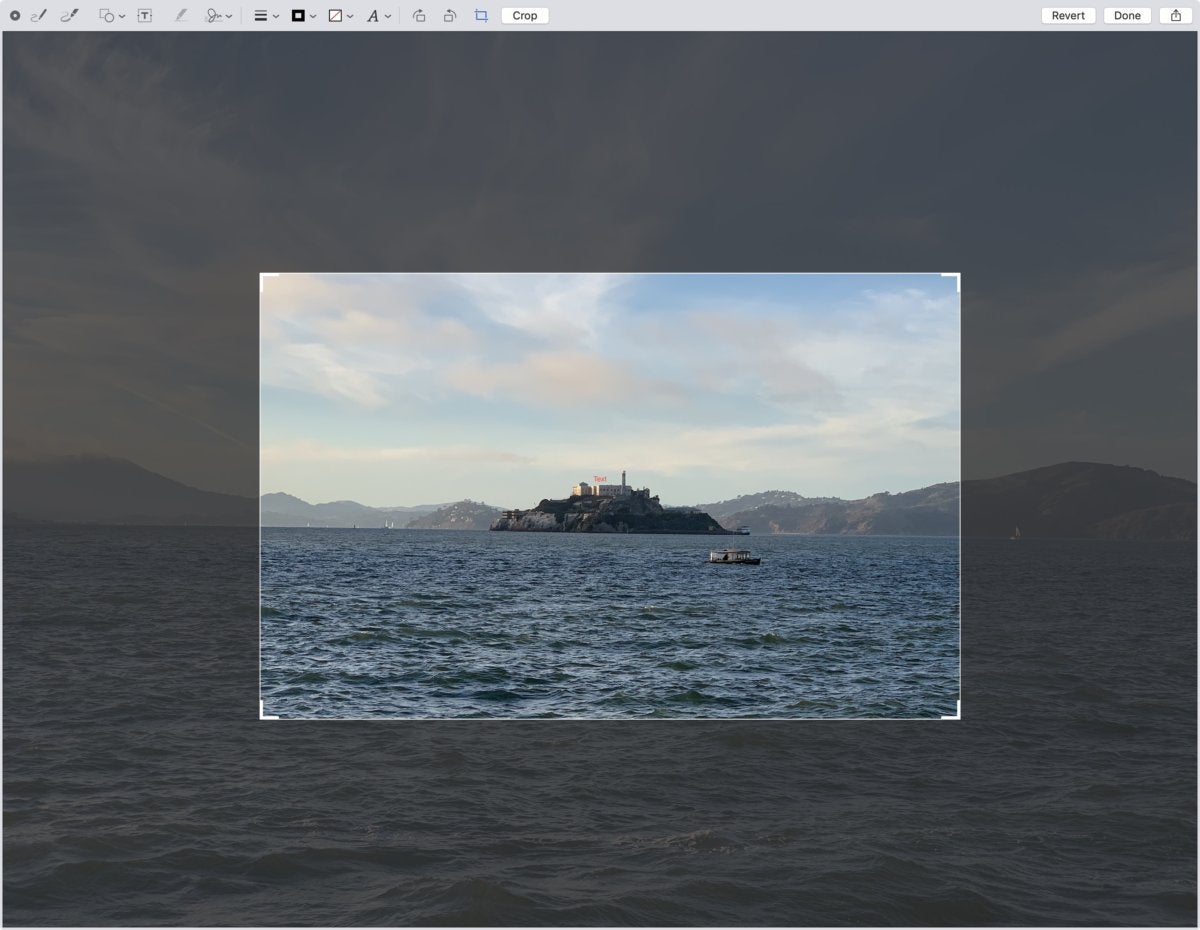
Crop a photo directly in Quick Look. No need to open an app.


Mojave makes Quick Look most robust, providing simple editing tools so you don’t even need to open an app. Now when you preview an image (select it and then press the space bar), you can click on the Quick Actions icon between the Rotate icon and the Open in Preview button, and a set of editing tools appears. You can rotate in 90-degree increments and crop images, and there’s even a set of markup tools you can use to write notations. For audio and video, you can trim clips.

If you are perusing through dozens and dozens of photos and videos, the new Quick Look Quick Actions helps a ton with simple crops and trims. It can be a real time saver.


MacOS Mojave News, Stocks, Voice Memos, and App Store


If you frequently use the News, Stocks, and Voice Memos apps on your iPhone or iPad, then you’ll probably find good use for them on your Mojave Mac. With the News and Stocks apps, your preferences can be saved to iCloud, so your topics, channels, watch list, and more are syncs between all your devices. Voice Memos can save your recording to iCloud so you can access them on any device.


mojave apple news

The new News app in macOS Mojave.


Of these apps, I’ll get the most use out of the News app. It seems that people tend to rely on social networks to get their news, but with social networks, the people you follow are the arbiter of what shows up on your feed—and for a lot of people, that’s preferable. I like to have more control over the articles that are fed to me, and that includes topics that may not necessarily jibe with that of the people I follow. The News app allows you to set your sources and subjects, so you can get a feed that’s customized to your interests.

Apple has also redesigned the App Store, so it’s easier to find apps. The company is also putting a more effort into your ability to learn about new software, by featuring App Store editors’ picks and curated app lists.


Group FaceTime: Coming soon to macOS Mojave


If these reasons aren’t compelling enough for you to upgrade to Mojave now, there’s a feature coming soon that will make you want to upgrade: Group FaceTime. When it becomes available—Apple says it’ll be here later this fall—you’ll be able to do a group chat with up to 32 people using a Mac, iPhone, or iPad. If this feature was available now (and it worked well), it’d be the number one reason why you should upgrade to Mojave.


mojave group facetime

Let’s hope Group FaceTime comes to the Mac sooner than later.


  – https://is.gd/VOwP4k

❤ How to Disable URL Link Previews in Messages for iOS & MacOS


The Messages app in newer releases of iOS and MacOS will attempt to render a small preview of any webpage URL or link that is shared within the Messages app. Usually the link preview will pull the title of the article or webpage, an image, and the domain of the URL being shared, all in a little compact thumbnail preview seen in the Messages thread on an iPhone, iPad, or Mac. The Message link previews are useful to many people, but some users may not like the URL previews, and some more cautious users may prefer to see the full URL of a link at all times, especially before clicking on it.

We’ll show you a few tricks to disable the link previews of URLs sent and received in the Messages app of iOS and MacOS.

First, if you’re looking for a switch or setting for this, you won’t find one because it does not exist. So be aware that the approaches covered here are effectively workarounds, as there is no method of disabling the URL link previews in Messages app completely, either on the Mac, iPhone, or iPad. But with that said, you can effectively disable URL link previews in Messages on a per-message basis by using a few text tricks.


How to Prevent URL Link Previews in Messages for iOS and Mac OS


This comes down to a simple text trick. Essentially, you need to wrap the URL in text. You can do that in several different ways:


Option 1: Put the link in a sentence, or between words


  • Put a URL in the middle of a sentence like this http://osxdaily.com and then share it as usual

Simply placing the link being sent through Messages in between words or in a sentence will remove the message preview on an iPhone, iPad, or Mac.


Just note that the words or text must appear on both sides of the URL to work as intended. Basically anything like “words URL words” will do the job and disable the Message URL preview, and instead show the full URL.


Option 2: Place periods on both sides of the link being shared


Just wrap the URL in periods and send the link as usual. This is just a variation of the above trick but rather than placing the URL in a sentence or between words, you’re placing the URL between periods.


Interestingly, if you use periods on both sides of the URL, then Messages in both iOS and MacOS will strip the periods out, as long as they surround a complete URL like so:

.http://osxdaily.com/.

This means that, once the message with the URL is sent, it will appear as so:

http://osxdaily.com/

And yes, without the iMessage preview.

While the above screenshots focus on the iPhone and iPad by demonstrating the iOS Messages app, the tricks work identically on the Messages app for Mac, where the same techniques will disable the URL preview on the Mac side of things too (for both sending and receiving). The screenshot below demonstrates this with a link preview, as well as a link without the URL preview on the Mac:


And note this is NOT the same as disabling message previews with Notifications in iOS lock screens or MacOS, which is a completely separate feature that disables the preview text of a message

By the way, if you’re interested in seeing the full link in Messages, you probably also would prefer to see the full URL of a link in Safari on Mac too, which is curiously not the default. – https://is.gd/7q3n8t

❤ How to Set an Animated GIF as Screen Saver on Mac OS


Have you ever wished you could have an animated GIF as the screen saver on a Mac? Well there’s no reason to wish, because an animated GIF screen saver can be a Mac reality, with no rubbing of genie bottles needed.

Using an animated GIF as a screen saver is a bit goofy and probably not appropriate for most people, but if you have a favorite animated GIF and want some low-resolution eye candy for fun or enjoyment, then this screen saver option may be right for you.


How to Use an Animated Gif as Screen Saver in Mac OS


This guide will be using a free third party screensaver to enable the usage of animated GIFs as the Macs screen saver, here are the steps:

  1. Download AnimatedGIF screen saver here from GitHub
  2. After you download the AnimatedGIF screen saver file, you can install the screen saver manually or double-click it and install it on the Mac that way
  3. Now go to the Apple menu and choose “System Preferences” and go to “Desktop & Screen Saver”
  4. Under the ‘Screen Saver’ tab, select “AnimatedGIF” from the left side menu, then click on “Screen Saver Options” to configure your animated gif screen saver


Now you just need an animated GIF to use as your screen saver.

There are a variety of settings to configure, including whether you want to center or stretch the gif on screen, adjust frame rate, load the animation, change the surrounding background color if the gif is centered, amongst other options, but all you really need to do is set the animated GIF path to the animated GIF of your choice.


It’s up to you how you want to arrive at an animated GIF to use as your screen saver (more on that in a moment). In the examples above I used a simple animated GIF created for this article about posting Live Photos to Instagram and Facebook. If you just want a quick animated GIF to test this out with yourself, you can try this fireplace GIF I created some time ago for a different post:


You can find animated gifs just about anywhere on the web. You can find one and save it from the web, you can make your own animated GIFS, you can convert a video to an animated GIF using GifBrewery or the simple Drop to Gif tool, you can send Live Photos as animated gifs to yourself and use that, or you could convert a Live Photo to animated gif using an iPhone app. You can even browse and send animated GIFs directly in the Messages app of iPhone and iPad, of which you could find a suitable animated GIF, send it to yourself, save that picture message to the Mac, and then use that as your screen saver. Or maybe you’re a huge Animoji fan and you want your Mac screen saver to be a talking Animoji, in which case you can use this guide to convert an Animoji to animated GIF and then use that for this purpose.

Don’t forget that you can also set a screen saver as Mac desktop wallpaper too, which works great with this – just in case you want an animated GIF as your desktop background – or you can use a free tool called GIFpaper to achieve a similar effect.

The potential is endless with animated GIFs, and with screen savers for that matter (the Apple TV screen savers on the Mac is my personal favorite, and using a movie as a screen saver is a neat trick too, though for Mac laptops I often use a custom “lost and found” message screen saver when traveling), so find something that suits your fancy and enjoy. – https://is.gd/Vb48XO

❤ How to Downgrade MacOS Mojave Beta to a Prior MacOS


Some adventurous Mac users have installed macOS Mojave 10.14 beta onto their compatible computers, whether for development or testing purposes. While running beta system software can be interesting and exciting, it can also be buggy, less stable than expected, or have some incompatibilities which make consistent use to be impractical or impossible, thus it may be desirable for some to downgrade from MacOS Mojave 10.14 beta and back to a stable build of MacOS system software.

We will cover how you can easily downgrade from MacOS Mojave beta to revert back to another version of MacOS.

Note this particular approach to downgrade MacOS Mojave beta relies on having a Time Machine backup made prior to installing MacOS Mojave beta in the first place. Essentially you will be formatting (erasing) the Mac, then restoring from Time Machine using the backup you have handy. If you do not have a Time Machine backup made prior to installing MacOS Mojave beta, then this technique will not work for you and instead you’d need to rely on likely formatting and performing a clean install of a prior MacOS build.

Warning: Do not proceed without a prior Time Machine backup that you can use to restore to. You will be formatting and erasing the hard drive in this process, this will destroy all files and data on the drive. Do not proceed without having a backup of your files and data. Failure to do so will result in permanent data loss of everything on the drive.

Before beginning, confirm that a Time Machine backup exists from a prior MacOS installation (i.e. made before updating to MacOS Mojave beta) that you can use to restore to. You’ll also want to be sure you have a current backup of your important files and data, and any files or data that is important that was changed between updating to Mojave beta and the decision to revert to a prior MacOS release.


Downgrading from macOS Mojave 10.14 Beta


The guide assumes you have a Time Machine backup made from prior to updating to macOS Mojave beta, the backup can be for another version of MacOS like Sierra, High Sierra, or El Capitan. If you do not have a Time Machine backup from a prior MacOS build, do not proceed with this approach.


  • Connect the Time Machine backup drive to the Mac which contains the prior system backup, this is what you’ll be using to restore from
  • Reboot the Mac, then immediately hold down Command + R keys to boot into Recovery Mode
  • At the “macOS Utilities” screen, select “Disk Utility” from the available options


  • In Disk Utility, choose the disk with macOS Mojave beta currently installed on it, then click the “Erase” button to start the data removal process
  • Give the drive a new name and then select either “Apple File System (APFS)” or “Mac OS Extended Journaled (HFS+)” as the file system format, depending on what is appropriate for your Mac and the version of system software you are reverting to*
  • When satisfied with the drive configuration and file system, click “Erase” – THIS ERASES ALL DATA ON THE DRIVE, DO NOT PROCEED WITHOUT A BACKUP
  • After the drive has finished formatting and erasing, it will be devoid of all data, so quit out of Disk Utility to return to the ‘macOS Utilities’ screen
  • Back at the MacOS Utilities screen, now choose “Restore from Time Machine Backup”


  • Select the Time Machine volume as the backup source, then click Continue
  • From the “Select a Backup” screen of Time Machine, select the most recent backup available that corresponds to the version of MacOS you want to revert back to in the downgrade (High Sierra is 10.13, Sierra is 10.12, El Capitan is 10.11, etc), then choose Continue again
  • Choose the destination drive to restore that Time Machine backup to, this will be the drive you formatted just a moment ago, then click on “Restore” and confirm that you wish to restore the backup to that drive
  • The restore process will begin to transfer the Time Machine backup to the target drive, effectively downgrading MacOS Mojave to the version of MacOS that was installed when that particular Time Machine backup was made, just let this process complete – it may take a while


Once the backup has restored to the Mac, the computer will reboot back into whatever macOS version was installed when that backup was made. For example, if the Time Machine backup is from macOS High Sierra, it would restore back to that, or if the backup was made with Sierra, then it would downgrade from Mojave back to Sierra using that restored backup.

* Note that choosing APFS or HFS+ depends on your particular Mac as well as what version of system software you are restoring to. For example, Macs restoring to Sierra or El Capitan will use HFS+ but Macs with an SSD restoring to High Sierra would use APFS. Regardless of what file system format you choose, the Mac hard drive will be erased and all contents permanently removed.

This represents the absolute simplest way to revert from macOS Mojave beta back to a different MacOS system software version, whether its High Sierra 10.13.x, Sierra 10.12.x, El Capitan 10.11.x, or otherwise.


Other downgrade options for macOS Mojave


There are other options available to downgrade from MacOS Mojave however, including restoring from an imaged hard drive if you happened to make one before installing Mojave, or even just wiping the drive and performing a clean install of the other version of MacOS system software, whether that’s SierraEl Capitan, or High Sierra, or performing an internet recovery of whatever version of Mac OS shipped preinstalled on the Mac. Likewise you can also use the MacOS Mojave beta boot installer drive to perform a clean install of MacOS Mojave if you wanted to, though obviously that would not be downgrading anything, it would just be wiping the Mac and performing a clean install of the beta.

If you’re downgrading from MacOS Mojave beta because you have decided that beta system software is just not for you, then that’s OK too, you can always install the final version of macOS 10.14 when it debuts, and Apple has said that MacOS Mojave will be released in the fall of this year.


I don’t have a backup from before installing macOS Mojave beta, what should I do?


If you do not have a Time Machine backup made before you installed macOS Mojave beta, then you should not attempt to downgrade from MacOS Mojave – unless you don’t mind losing all of your data, files, apps, etc because downgrading without a backup requires formatting and performing a clean installation of MacOS system software. A better solution would be to stick with the beta of Mojave and continue to update it with beta software updates until the final version comes out – and yes the beta versions can update to the final version (or at least they have been able to in the past, so assuming that policy continues forward with MacOS Mojave too). – https://is.gd/L0bIZE

❤ How to Make a MacOS Mojave Beta Bootable Install USB Drive


Creating a bootable MacOS Mojave beta installer drive with a USB key or flash drive is a common desire for many advanced Mac users testing the upcoming macOS 10.14 operating system.

A bootable macOS Mojave installer has several benefits, including the ability to format a target disk, easily perform clean installs, the ability to install the beta on multiple Macs without having to re-download the installer, and of course since it’s bootable it can be used as a troubleshooting device for macOS Mojave beta Macs as well.

The tutorial here will walk through how to make a bootable USB install drive for the macOS Mojave 10.14 beta.


Requirements to Make a macOS Mojave 10.14 Beta USB Install Drive


Before getting stated, you’ll need to meet a few simple requirements to be able to properly create a functioning macOS Mojave beta installer boot drive:

Building a USB install drive for macOS Mojave beta requires using the command line, where exact syntax must be used in order to avoid erroneously erasing the wrong volume. Be sure to backup the Mac before beginning this process.


How to Make a Bootable macOS Mojave 10.14 Beta USB Installer Drive


  • First, connect the USB flash drive to the Mac (if the USB flash drive is not yet formatted as MacOS Journaled Extended, do that first with Disk Utility)
  • Download the macOS Mojave developer beta installer application from the Mac App Store
  • When the macOS Mojave 10.14 beta installer has finished downloading it will automatically launch, quit out of the Mojave beta installer app, be sure to leave the “Install macOS 10.14 Beta.app” within the /Applications/ folder on the Mac
  • Now open the “Terminal” application, found in /Applications/Utilities/ directory
  • Enter the following command at the Terminal command line, replace “UNTITLED” with the USB drive name if necessary for your situation:


sudo /Applications/Install\ macOS\ 10.14\ Beta.app/Contents/Resources/createinstallmedia --volume /Volumes/UNTITLED && echo Mojave Drive Created


  • Confirm the syntax is correct and hit the Return key and enter the administrator password as required by sudo
  • The MacOS Mojave 10.14 beta installer drive will begin immediately, it can take a while to finish


After the macOS Mojave 10.14 beta USB installer drive has finished being created, you can use it just like you would any other bootable Mac OS install drive. You can immediately run the installer, or eject the drive and use it on another Mac, or reboot the computer with it attached so that you can boot from the Mojave beta installer to install the update, perform a clean install, or partition the Mac to install Mojave beta onto that partition instead. There are many options available for how to use the macOS Mojave beta install drive.

* If you are getting a “command not found” error, it’s likely that the syntax entered is incorrect, or the Install macOS 10.14 beta app installer is not downloaded and located within the /Applications directory.


Note this applies to the current macOS Mojave developer beta, we will update with instructions for the macOS Mojave public beta when it becomes available.


How to Boot from the macOS Mojave Beta USB Install Drive


  • Connect the macOS Mojave 10.14 beta install drive to a Mac via USB if you have not done so already
  • Reboot the Mac and hold down the OPTION key
  • At the boot menu choose the macOS Mojave 10.14 beta installer volume to boot from


After you have booted from the macOS Mojave 10.14 beta USB drive, you can perform an installation of macOS Mojave beta, run Disk Utility to format or partition a drive, work with Time Machine, use the Terminal, or perform other common tasks from the bootable volume.


Once booted from the USB drive you can proceed with installing macOS High Sierra, using the Disk Utility tools to format or erase a volume, work with Time Machine, and other similar tasks. If you are aiming to install macOS Mojave beta onto a Mac, be sure the target Mac meets the macOS Mojave system requirements for compatibility. – https://is.gd/IL8KRY

Apple is backing up AirPods with American jobs

Siri, why is Apple buying Shazam?


Apple is pouring $390 million into an American company that helps power AirPods and FaceID — an investment that will create 500 jobs in Texas.

The money will come from a $1 billion fund that Apple established earlier this year to boost U.S. manufacturing jobs.

Apple says the cash will help Finisar, a chip maker, restart a 700,000-square-foot manufacturing facility in Sherman, Texas, by the second half of next year. The new plant will create 500 “high-skill” jobs.

Finisar produces “vertical-cavity surface-emitting lasers” (VCSELs), which power some Apple’s newest features, including Face ID, Animoji, Portrait mode selfies and AirPods.

The investment will go toward rebooting a previously closed 700,000-square-foot manufacturing facility in Sherman, Texas. The new plant, which will create 500 jobs, is expected to open in the second half of next year.

“VCSELs power some of the most sophisticated technology we’ve ever developed and we’re thrilled to partner with Finisar over the next several years to push the boundaries of VCSEL technology and the applications they enable,” Apple COO Jeff Williams said in a statement.

AirPods are wireless earbuds introduced in 2016 as an untethered way to listen to music, take phone calls and use the Siri voice assistant. Its arrival caused backlash for being easy to lose, but experts said it could be the future of headphones.

Meanwhile, Face ID — which debuted on the iPhone X this year — is touted as a more secure way of unlocking your phone. Considered difficult to hack than other systems, other smartphone companies could take Apple’s lead and launch similar features in the future.

Related: Tim Cook: Apple creating $1B fund to bring manufacturing jobs to the U.S.

Finisar is the second company to receive an investment from Apple’s U.S. manufacturing fund. In May, Apple (AAPL) pledged $200 million to glass manufacturer Corning. The company makes Gorilla Glass displays for smartphones and tablets, including for Apple products.

At the time, CEO Tim Cook teased Apple could add more money to the fund, calling the $1 billion an “initial” donation.

President Trump has been pushing Apple to move its manufacturing efforts from China to the U.S. On the campaign trial, Trump said: “We’re going to get Apple to build their damn computers and things in this country instead of in other countries.”

In July, Trump said Apple CEO Tim Cook has “promised” to build “three big plants, beautiful plants” in the U.S.

It’s unclear where those facilities would be located or how many workers would be employed.

“If we can create many manufacturing jobs, those manufacturing jobs create more jobs around them because you have a service industry that builds up around them,” Cook said of the fund on CNBC earlier this year.

The tech giant already relies on some domestic manufacturing. For example, the Mac Pro is assembled in Austin, Texas, and so are its Samsung processors. Other iPhone parts, such as cell and Wi-Fi radios, as well as its Corning displays, are made in the U.S.

Apple isn’t the only tech company adding more jobs to the U.S.

Taiwanese electronics manufacturer Foxconn has pledged to invest $10 billion to build a factory that makes LCD screens in Wisconsin. The facility is expected to create between 3,000 and 13,000 new jobs and should be open by 2020.


https://goo.gl/ieSLvi