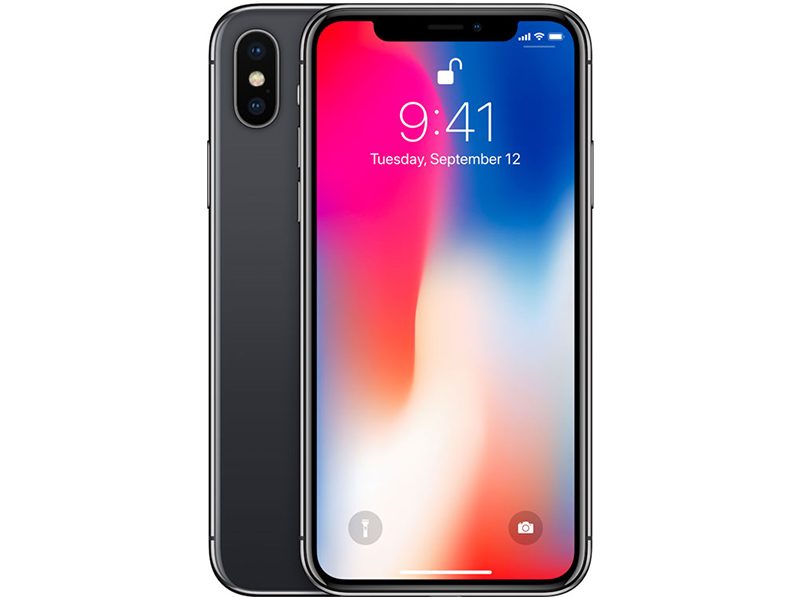
❤ iPhone X Ringer Volume Very Low? Here’s the Fix


Have you noticed the iPhone X ringer volume goes from loud to low? Often iPhone X users notice that the iPhone X ringtone will sound very quiet after initially sounding loud, but despite pressing the volume up buttons they can’t get the iPhone X ringtone to sound loud again, it’s just stuck quiet. Don’t fret and there’s nothing wrong with your iPhone X for exhibiting this behavior, in fact this is actually a feature.


If your iPhone X rings loud but then gets quiet and stays quiet, but you’d rather have the iPhone X ringer volume stay loud all the time when getting a call, read on to learn the proper settings adjustment to stop this behavior. The end result will be that iPhone X sounds loud on incoming calls all the time and the iPhone X will stop quieting the ringtone volume itself.

What causes the iPhone X ringtone volume to be very low after initially sounding loud? It’s actually a Face ID feature. And yes, this ring sound volume lowering capability applies even if Face ID is not being used on iPhone X to unlock or authenticate the device, and much like how Animoji uses the Face ID camera to scan your face even if you aren’t using Face ID authentication, the front camera for face scanning is active for other features too, and that includes the ringtone volume.


How to Stop iPhone X Ring Volume Going Quiet


You can disable the attention awareness feature that scans your face and determines you’re looking at the iPhone X, which in turn lowers the ring volume on the device. With this feature turned off, the iPhone X will stop lowering the ring volume of calls automatically when you pick up the iPhone and look at it.


  • Open the “Settings” app on the iPhone
  • Go to the “Face ID & Passcode” section
  • Locate the “Attention Aware Features” option and turn the switch to the OFF position
  • Exit out of Settings


You can confirm this works by getting an incoming call on iPhone X, it should now be loud as your settings were set to beforehand and no longer quiet the call to a very low volume automatically.

Another helpful step is to make sure your iPhone ringer volume is turned up all the way to the loudest setting, since sometimes users have inadvertently made the iPhone volume low.


How to Turn Ringer Volume Up to the Loudest Setting on iPhone X


Here’s how to adjust the Ringtone Volume so that it is up all the way to a loud setting:

  1. From the “Settings” app go to “Sounds & Haptics”
  2. Under the ‘Ringer and Alerts’ section slide the volume indicator all the way to the right for full volume
  3. Optionally, toggle the switch for “Change with Buttons” if you want to be able to adjust ringtone volume with the physical buttons on the iPhone*

* Some people turned this Volume button adjustment feature off long ago, particularly if they have kids that like to fidget with their iPhone. But many new iPhone models ship with this feature disabled by default. Whether you want to adjust the ringtone volume by the volume buttons is a matter of personal preference and your individual usage.

Finally the other options to make sure are not enabled is the physical hardware mute button on the side of the iPhone (if you can see the little orange indicator, mute button is on), and also check for Do Not Disturb not being enabled, since Do Not Disturb mode will cause an iPhone to not get incoming calls or make sounds at all.

Keep in mind that if you press the volume buttons on an iPhone when a call is actively incoming, you will mute the incoming call sound on the iPhone just temporarily for that specific individual phone call. That’s a completely separate feature and it’s quiet useful if you’re in a meeting or talking with someone and you want to quickly silence just that single call without muting the phone entirely.

That should cover all the bases, and your iPhone X should now ring loud for incoming calls as usual just like other iPhones do. No more automatically quieting down after the first ring, as long a you have the facial attention awareness feature off this behavior will stop. – https://goo.gl/vypZGz

❤ How to Delete Apps from iPhone X and 3D Touch iPhone Models


Removing apps from an iPhone or iPad has always been an easy endeavor, and you can easily uninstall any iOS app from a device in just seconds. Of course iPhone X and 3D Touch iPhone models can still quickly delete apps from the home screen too, but because of some hardware features of those devices, deleting apps may appear like it works differently. Some users may attempt to delete an app on iPhone X or other 3D touch iPhone models and find that no “X” appears at all, or that the icons don’t jiggle, or that they feel a little buzz sensation and then find a pop-up menu instead of the “X” button to delete an app.

This guide will walk through how to delete apps on the newest iPhone models, including understanding how deleting apps works on iPhone X, and also offer some general tips on deleting apps on any other iPhone with a 3D Touch screen.


How to Delete Apps on iPhone X


Deleting apps from iPhone X can still be done from the Home Screen, and rather quickly, but there’s a few minor differences. Here’s how the complete process works on the devices without a Home button:

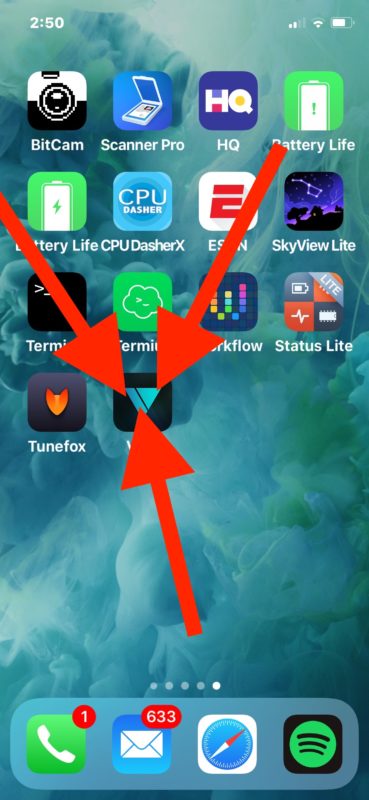
  • Tap and hold down on an app icon for an app that you want to delete from iPhone – do not press with any pressure *


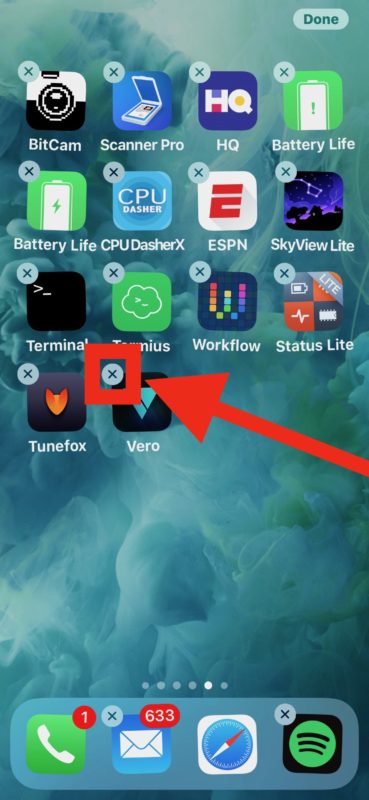
  • After the app icons start to jiggle, tap the (X) button that appears in the corner


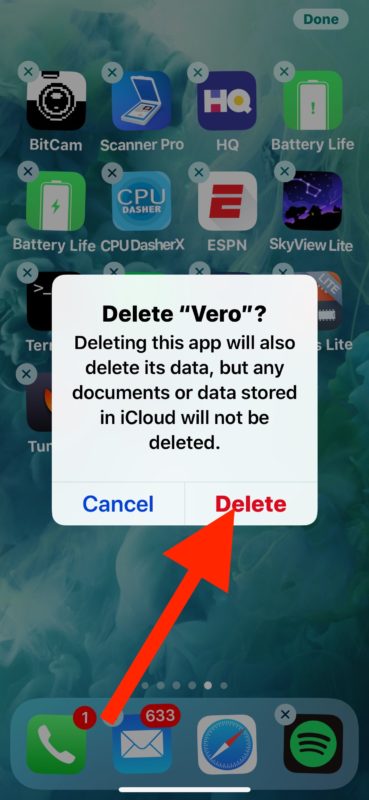
  • Confirm that you want to delete the app by tapping the “Delete” button on the ‘Delete app’ pop-up dialog


  • Repeat with other apps if desired by also taping their “X” over on the app icon, and confirm deletion as necessary
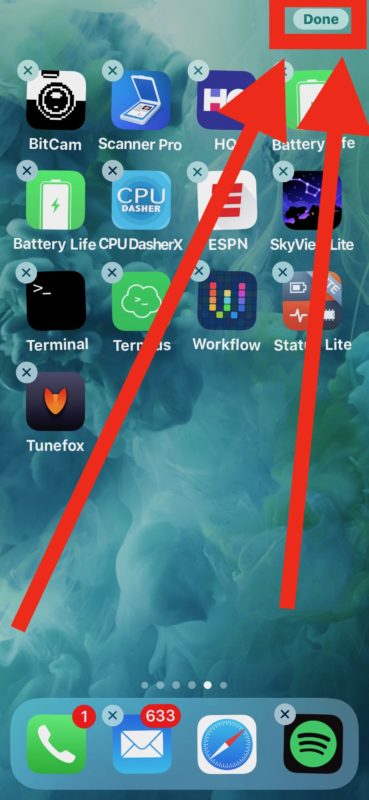
  • When finished, tap the “Done” button in the upper right corner of iPhone X screen next to the notch, or swipe up from the screen bottom to mimic a Home button


Perhaps the primary difference with deleting apps on iPhone X versus other models is that there is no Home button to exit the app deleting mode, where icons are wiggling and jiggling. Instead you either mimic the Home button to exit Delete / Move mode, or you hit the “Done” button in the corner of the iPhone X display next to the notch.

The other main difference in deleting apps on newer iPhone models applies not only to iPhone X, but also to all other iPhone displays with 3D Touch capability. We’ll discuss that separately since it has become a major point of confusion for some iPhone users.


How to Delete Apps on iPhones with 3D Touch Displays


* The 3D Touch feature can cause some confusion and frustration when trying to delete apps from iPhone models with 3D Touch screens. If you 3D Touch many app icons on iPhone, a little submenu of options for that app shows up, but no Delete option or no “X” button appears.

It is very important to just tap and hold on the screen to activate the app icon jiggle mode, do not physically “press” down with pressure otherwise you will activate 3D Touch on the iPhone display.

This 3D Touch press feature alone leads to a lot of confusion about deleting apps, not just on iPhone X but also other 3D Touch equipped devices like iPhone 8, iPhone 8 Plus, iPhone 7, iPhone 7 Plus, etc.


Here’s how the deletion of apps works on iPhone with 3D Touch screens:

  1. Find the app icon you want to delete on the iOS Home Screen
  2. Tap and hold on an iPhone icon that you want to delete – do NOT press down with any physical pressure on the screen otherwise you would activate 3D Touch instead
  3. Tap the “X” button to delete the app, then confirm you wish to delete the app at the dialog alert
  4. Press the “Home” button to exit Delete Mode, or swipe up from the bottom of the screen if iPhone supports that gesture as a Home button replacement


3D Touch has a lot of great features available to it, but it can also be a confusing feature in and of itself if you don’t quite understand how it works or how sensitive it can be. You may find it helpful to adjust 3d Touch sensitivity on the iPhone display.

The big thing to remember with any 3D Touch equipped iPhone is that if you’re trying to simply delete an app, or even move one around the screen, you can not physically press down on the screen. Physically pressing down on the display activates 3d Touch. Just lay a finger on the app icon with zero pressure instead.

If you can’t quite figure out how this 3D Touch approach works, you can also choose to disable 3D Touch on iPhone models with the screen feature, which will allow for a more forgiving experience when trying to delete apps (or move them around on the Home Screen) because the display will no longer be pressure sensitive.

Note this particular approach only applies to select newer iPhone models (for now anyway) since the current iPad line still has a Home button, and also doesn’t have 3D touch. On iPad models and any other iPhone with a Home button or without 3D Touch, or with 3D Touch disabled, you can use the regular iOS app uninstall method without thinking about screen pressure, or Home button gestures.

And in case you were wondering, the methods outlined above works the same to delete any third party iOS apps as well as deleting default apps from iOS too. – https://goo.gl/7SPVY7

How to Use Animoji on iPhone X


Animoji is one of the major new software features available on iPhone X. For the unfamiliar, Animoji are animated cartoon renditions of things like a smiling pile of fecal matter, a unicorn, dog, cat, chicken, panda, pig, fox, alien, and other figures, and the Animoji feature works by using the Face ID front-facing iPhone camera to see how your face is changing and mimic those facial expressions on the animated character. You can then record little snippets of Animoji and send them to people, leading to messages that include something like a talking animated unicorn or talking animated pile of feces.

This thrilling new Animoji feature is easy to use, but it’s also easy to overlook. That’s because Animoji capabilities are built into the Messages app of iPhone and is, currently anyway, not a separate application. Thus, to create and use Animoji, you must start from the iPhone Messages app. The tutorial below walks through how to use Animoji on the iPhone X.


Animoji is only available on the latest and greatest iPhone X models with Face ID, the feature is not available on earlier iPhone models, it must be iPhone X (or newer). Animoji is not available on iPhone 8, iPhone 7, iPad, or earlier iOS device models.


How to Use & Send Animoji on iPhone

Ready to make and send an Animoji? Here’s how it works:

  • Open the Messages app on iPhone X


Messages


  • Open a message thread with a person you want to send an Animoji to
  • Tap on the Apps button, it looks like an “A” made out of popsicle sticks


How to use Animoji on iPhone


  • Tap on the Monkey icon, it looks like a cartoon monkey face with it’s mouth open


How to use Animoji on iPhone


Swipe up or down on the left-side Animoji character icons and choose your animoji:

  • unicorn
  • chicken
  • mouse
  • dog
  • cat
  • pig
  • panda
  • smiling pile of feces
  • fox
  • alien
  • ghost


How to use Animoji on iPhone


  • Look at the iPhone and make a face or shift your head and facial expression to see how the Animoji on screen adjusts
  • When ready to record an Animoji video tap the big red button in the corner to start to record an animoji sequence


How to use and record Animoji on iPhone


  • Talk and make faces as you want to, the Animoji character will adjust, tap the red stop button when finished creating your Emoji recording
  • Tap the blue arrow button to send the animoji to the recipient via Messages


How to send Animoji on iPhone


The recipient will receive a short video clip of the Animoji.

For example, here’s an Animoji of the smiling feces that is mimicking the human facial expressions as seen through Face ID camera on the iPhone.


Animoji includes an Animated poop emoji as an Animoji character


If the recipient of the Animoji has an iPhone X or newer model device, the animoji will appear as an integrated looping video.

If the recipient of the animoji has a Mac or earlier iPhone or iPad model, the animoji recording will arrive like any other video in a .mov file format.


Can you save Animoji video messages?

Yes. The Animoji recording will default to staying in your Messages app unless it is deleted.

Additionally, you can manually save an animoji like you would save any other image or video from iOS Messages or with Mac Messages.

(A quick side note; the Animoji recordings are not animated gifs by default, but you can easily convert the Animoji to GIF by using Drop To Gif or similar video to GIF conversion tools).


Can you use Animoji without using Face ID?

Yes, you can use the Animoji feature with facial recognition even if you do not use Face ID on iPhone X.

If you have an iPhone X you have perhaps already used the Animoji feature, or at least seen it sent from someone else, or perhaps even on TV. The Animoji feature has been demonstrated in Apple commercials (embedded below) has surfaced in a wide variety of popular videos elsewhere on the web.


Have fun with Animoji, they’re sure to be a prominent inclusion in future iPhone and iPad software, much like Messages Stickers, Messages apps, emoji icons, and the other busy and goofy features bundled into the iOS Messages app. – https://goo.gl/bJ4Ezi

How to Disable Tap To Wake on iPhone X


The iPhone X includes a feature called Tap to Wake, which, much as it sounds, allows the locked iPhone screen to wake up with a tap anywhere on the screen. This makes a lot of sense because the device does not have a Home button to press and wake the screen, so a tap anywhere on the display sort of replicates that Home press function, but Tap to Wake may also lead to a lot of unnecessary screen waking, and theoretically any erroneous screen waking may lead to a detriment to battery life.

Many users like Tap to Wake and find it to be convenient, but if you don’t like the feature or you’re concerned about waking the screen repeatedly either on accident or not intentionally, then you may want to disable the Raise to Wake feature on iPhone X.


It’s worth pointing out that iPhone X defaults to enabling both Tap To Wake and Raise To Wake, so if you disable one, you may want to keep the other enabled, or perhaps disable both if you don’t want to use either alternate wake function.


How to Disable Tap To Wake on iPhone X


  • Open the “Settings” app on iPhone
  • Go to “General” and then choose “Accessibility”
  • Scroll down and locate “Tap To Wake” and toggle the switch to the OFF position


Disable Tap to Wake on iPhone


  • Exit Settings and use iPhone as usual


Now the iPhone X will no longer automatically wake the screen just by tapping it, instead you will need to either rely on Raise To Wake (unless you disabled Raise to Wake on iPhone as well), or pressing on the side power button to wake the screen.


Tap to Wake on iPhone X


It’s not immediately clear why this setting is located in Accessibility rather than the Display settings on the iPhone along with Raise To Wake and other screen adjustments, but for the moment that is where Tap to Wake settings are found in iOS.

Note if you disable both Tap to Wake and Raise to Wake, then unlocking the iPhone X will likely feel or appear a bit slower, because you have to manually wake the screen and then either use Face ID to unlock, or use the slide to unlock gesture on iPhone instead of Face ID. Basically by disabling these features you require an additional step of manually waking the display before being able to access iPhone X.


How to Enable “Tap To Wake” Screen on iPhone


Of course if you decide you regret disabling Tap To Wake you can immediately turn it back on again at anytime by returning to Settings:

  1. Open the “Settings” app in iOS
  2. Go to “General” and then to “Accessibility”
  3. Locate “Tap To Wake” and toggle the switch to ON position

This returns the iPhone X to the default state where Tap to Wake is enabled.

If you use Face ID to unlock iPhone, then if you tap on the screen while looking at the iPhone and swiping up, it will unlock the device and send you to the home screen. This happens quickly and seamlessly, similar to how unlocking a iOS device with Touch ID works.


iPhone X home screen


The Tap to Wake is a handy feature overall and is obviously valuable on the iPhone models that are missing a Home button, so expect this feature to be adopted on future iPhone and iPad devices as Face ID replaces Touch ID and the Home button over time. For this reason, amongst many others, you may just want to get used to tapping the screen to wake the display of your iOS devices. – https://goo.gl/GUsoXB

How to check if your iPhone X has a Qualcomm or Intel wireless modem inside


After all the commotion stemming from the fact that Apple has most likely crippledQualcomm’s X16 wireless modem inside certain iPhone X versions (looking at you, Verizon and Sprint ones), to match the inferior abilities of the Intel modem in AT&T and T-Mobile’s versions, it’s only logical that owners would want to know what variant they have.


Qualcomm’s X16 is the modem of choice for most flagships sold in the US, as it allows CDMA network access, and up to 1Gbps downloads, but since the Intel chip maxes out at 600Mbps, Apple has neutered the X16 to even all models out. This shows in direct comparison, with, say, the Note 8, which achieves nearly double the download speeds of the iPhone X on one and the same network.
Unfortunately, a difference is also shown between two iPhone X units with different modems – the Verizon model with Qualcomm, for instance, showed 67% better download speeds than AT&T’s version with Intel, when placed in scenarios imitating weak signal. If you want to know whether you have an Intel XMM7480 modem in your iPhone X, or the more capable Qualcomm gear, here’s what you need to do:
1. Go to Settings > About > Legal > Regulatory, and write down the model number of your iPhone X;
2. Alternatively, you can go to Settings > General > About, then scroll down to the Model entry, and tap on it to display the model number. Write that one down, too;
3. If your iPhone X version is A1865, then you have Qualcomm’s X16 powering your data downloads, go take a lottery ticket;
4. If the model is A1901, then you have Intel inside, and may experience some slower download speeds in areas with wonky signal, at least in theory;
5. There is a third model, as you can see from Apple’s own country and carrier model listings above, which adds support for Sony’s FeliCa contactless payments on iD and QuicPay as well as Suica support on JR East. It is exclusively for use on Softbank, AU, and NTT DoCoMo in Japan.
Apple is working together with Intel on gigabit LTE and 5G modems for next-gen iPhone, trying to break away from Qualcomm as a supplier, due to the ongoing patent feudbetween the two, but until that bright future comes, you’d better get the iPhone X A1865 model from Verizon or unlocked, just to be on the safe side. Needless to say, most countries and carriers flaunt GSM networks, so the “Intel inside” version of the X outnumbers the Qualcomm model, but you may just have lucked out.

https://goo.gl/jYH5iG

How to Disable Emergency SOS on iPhone X to Stop Accidentally Dialing 911

Disable Emergency SOS on iPhone X


The iPhone X offers an Emergency SOS feature which will automatically dial 911 when the devices side buttons are held down for several seconds. The Emergency SOS countdown then starts blaring an alarm and counts down from 3, 2, 1, before dialing emergency services on your behalf, thanks to a feature called Auto Call. While this could theoretically be useful in some extreme scenarios, it can also be triggered surprisingly easy by simply trying to force reboot the iPhone Xtaking a screenshot on iPhone X, by trying to temporarily disable Face ID, or even just by accident of holding down a few buttons.

With a little settings adjustment, you can disable Auto Call with Emergency SOS. With the feature disabled, you can still use Emergency SOS, but you will have to swipe the onscreen Emergency SOS control to dial emergency services, rather than simply hold down the iPhone X hardware buttons.

How to Disable Emergency SOS Auto Call on iPhone X

This disables auto calling of emergency services by holding down buttons on the iPhone X, yet still allows the feature to be used directly if need be.

  • Open the “Settings” app on iPhone X and then go to “Emergency SOS”
  • Disable “Auto Call” by flicking the switch to the off position


Disable Auto Call of Emergency Services on iPhone X


Now you can still summon the Emergency SOS screen (which is also the same screen which lets you shut down and turn off iPhone X and access Medical ID), without accidentally calling 911 due to the Auto Call feature by holding the buttons a little too long.

Again, you can still call emergency services through Emergency SOS if you disable Auto Dial, but you must swipe to the right on the Emergency SOS button when it appears on screen after holding down the side buttons on the iPhone X.


Emergency SOS screen on iPhone X


Don’t forget you can have Siri dial Emergency Services and 911 for you too, so if you have Hey Siri enabled for voice activation, you can do it entirely hands free, and perhaps more intentionally.

And in case you were wondering, yes people are accidentally dialing 911 due to this feature, and I myself have unintentionally activated it several times, thankfully canceling it within the few second countdown in time to avoid a mistaken call which ties up local emergency responders. The same feature also exists on the Apple Watch, where likewise people are accidentally dialing emergency services with that device too.

If you’re at all worried about this, or if you have discovered the siren alert blaring out of your pocket unexpectedly because it’s dialing 911, just disable Auto Call and you’ll prevent most erroneous dialing. – https://goo.gl/uZeB1c