❤ How to Turn Off iPhone XS, XS Max, XR, X

How to shutdown the iPhone and turn it off


Want to turn off iPhone for whatever reason? Newer iPhone models have a different method of shutting down the device to turn off the iPhone compared to earlier model devices. This article will show you how to turn off iPhone XS Max, iPhone XS, iPhone XR, and iPhone X.

Note that turning off the iPhone literally turns it off completely by shutting it down. When the device is powered off it will not be able usable in any way until it is turned back on again.

How to Turn Off iPhone XS, XS Max, XR, X

Turning off a newer model iPhone without a Home button is accomplished by holding down a button sequence to access the power off option. Here is how to turn off iPhone XS Max, XS, XR, and iPhone X:

  • Hold down both Volume Up button and Power / Lock button until you see “Slide to Power Off” at the top of the iPhone display


Turn off iPhone XS Max and iPhone XR and iPhone X


  • Swipe the slider right on the “Slide to Power Off” option to turn off the iPhone


Turn Off the iPhone by swiping on Slide to Power Off


The iPhone will power down and turn off completely. It will stay turned off until it is turned back on again.

Another Option for Turning Off iPhone: Shut Down via Settings

Another option is to shut down the iPhone or iPad through Settings, which does not require pressing any hardware buttons, but does still require using a slide to power off gesture:

  • Open the “Settings” app then go to “General”
  • Scroll down to the bottom of General settings and tap on “Shut Down”


How to shut down and turn off iPhone through Settings


  • Swipe on “Slide to Power Off” to shut down the iPhone

How to Turn On iPhone XS, XS Max, XR, X Again

If the iPhone is turned off, you can turn it back on again using either of the following methods:


  • Pressing the Power / Lock button on the side of the iPhone
  • Plugging it into a power source

These methods of turning the shut down iPhone back ON apply to all iPhone models, including iPhone XS, XS Max, XR, X, and even other iPhone models like iPhone 8, 8 Plus, 7, 7 Plus, 6s, 6s Plus, 6, 6 Plus, SE, 5S, and prior iPhones too.

If the iPhone won’t turn on, then read these troubleshooting steps to fix that. Note that hardware damage can prevent an iPhone from turning back on again, so if the iPhone is damaged or destroyed then it may need repair first.

Turning off the iPhone and turning it back on again can also be used as a method to perform a soft reboot of the iPhone. Hard reboots are immediate and less graceful and are a different process, though performing a hard reboot differs per iPhone (and iPad) model. If necessary you can read how to force reboot iPhone XS, iPhone XS Max, and iPhone XR, iPhone X, iPhone 8 and 8 plus, 7 and 7 plus, force restarting iPad Pro, and how to force reboot all iPhone or iPad with clickable Home buttons which includes basically all older model devices and all modern devices where the Home button can physically be pressed down. – https://is.gd/ByCMOM

❤ Fix the 3 Most Annoying Features on iPhone X


The iPhone X may be the most elegant and beautifully designed iPhone in years, but that doesn’t mean it’s perfect. While most users have no complaints about the iPhone X itself, there are some frustrations and annoyances that can continually pop-up for some iPhone X owners.

Among the most common iPhone X hassles are accidentally dialing 911, accidentally taking screenshots of the lock screen, and accidentally activating Apple Pay at the lock screen. Notably, each of these issues relates to the myriad functions assigned to the Power / Lock button, depending on how it is pressed.

But don’t be annoyed, because each of complaints can usually be fixed (or addressed), as we’ll show you with a few simple settings adjustments and tips.


1: Fix for Accidental Emergency Calls on iPhone


Some users have found that the new Emergency SOS feature is easy to accidentally trigger, which means your iPhone X could be in your pocket dialing 911 accidentally. The solution to this is disabling Emergency SOS 911 auto-call on iPhone X:

  1. Open the “Settings” app on iPhone and go to “Emergency SOS”
  2. Disable “Call with side button” and disable “Auto Call”

By turning off those settings you’ll no longer have the Emergency SOS feature accessible by pressing the side button, meaning you’ll have to dial 911 the old fashioned way, or use the Emergency Call feature on the iPhone lock screen.


2: Fix for Accidental Apple Pay Access at Lock Screen of iPhone


The Power button on iPhone X serves many purposes, including offering an ability to summon Apple Pay. This means that, if you’re like myself and many other iPhone X users, you may be constantly summoning Apple Pay when all you meant to do was turn on the screen, or unlock the device, or bring up Siri, or force reboot, or perform other tasks requiring using the power button. Perhaps the best solution for accidentally summoning Apple Pay is to disable Apple Pay access by double-pressing the power button at the lock screen:

  1. Go to the “Settings” app and then choose “Wallet & Apple Pay”
  2. Find the setting for  “Double-Click Side Button” and toggle it to the OFF position

Of course if you regularly use Apple Pay and don’t want to manually open the Wallet app on your iPhone, or use an Apple Watch for Apple Pay, this may not be an option for you.


3: Dealing with Frequent Accidental Screenshots at Lock Screen of iPhone


If you’re like many iPhone X users, you’re frequently taking accidental screenshots of the device, whether when you’re holding the iPhone X, putting it in and out of a pocket or purse, or just using the device. The reason you take accidental screenshots is because Apple changed the iPhone X screen shot mechanism (again) in such a way that it makes it remarkably simple to inadvertently take screenshots simply by holding the iPhone or handling it.

There is no easy way to resolve the constant accidental screenshots that many iPhone X users encounter. Aside from trying to train yourself to hold your iPhone differently, the next best solution is to simply visit “Screenshots” album and delete the screenshots you accidentally capture:

  1. Open the “Photos” app on the iPhone and then go to ‘Albums’
  2. Choose the “Screenshots” album, then tap the “Select” button and manually tap on every single accidental screenshot you’ve taken (if they’re all accidental use this gesture trick to easily select many photos at once on the iPhone)
  3. Tap the Trash can icon, then tap to confirm “Delete Photos” to remove the accidental screenshots

Unfortunately you’ll have to repeat this process every once in a while, as there’s not much you can do about this one right now other than try to hold your iPhone X in a different manner.

It’s worth noting that iOS 12 introduces a minor software change that can improve the accidental screenshot problem at the lock screen at least, so that may help some users to mitigate the accidental screenshot issue.


3 Other iPhone X Complaints


The aforementioned trio tends to make up the majority of iPhone X complaints, and the good news is those issues are all software related so are pretty easy to fix… but there are some other complaints that surface from time to time that are perhaps worth mentioning as well, even if there is no perfect solution to them.


4: No Touch ID or Home Button


The lack of a Home button can bother some iPhone X users, whether it’s because they like the tactile feel of a Home button to press, or perhaps because they liked Touch ID. Some may even prefer Touch ID over Face ID.

While you can use Assistive Touch to create a digital onscreen Home button on iPhone X, that’s more of a workaround then a solution. It’s really best to get accustomed to the swipe-up gesture that returns to the Home Screen.

If your frustration with lacking Touch ID or a Home button is about not wanting to use Face ID, or not liking Face ID, then realize that you can use iPhone X without Face ID, you’ll just end up swiping to bring up the passcode entry screen, sort of like the old swipe-to-unlock gesture.


5: The Screen Notch


The screen notch is a prominent black section on the top of the iPhone X screen that houses the front speaker, front camera, the Face ID sensors, and lighting detectors. Most iPhone X users don’t care about The Notch at the top of the screen, or if they do they get over The Notch pretty quickly and forget that it even exists, but some continue to be annoyed by it.

If you’re obsessing about The Notch then your only real option is to get over it and realize that it’s a silly thing to care about use a wallpaper that hides The Notch by trying to blend it into the wallpaper color. Usually anything with a black section at the top, or a very dark top works great for the purpose of masking the screen notch.

Of course it’s not just iPhone X that has a screen notch though, and many Android phones also include the notch as well, including the Motorola P30 and Xiaomi Mi8, so if you’re annoyed with it on one device, be prepared to be annoyed with it on many other phones too. And most rumors point to the next generation iPhone models as having a screen notch too, so.


6: The Lack of a 3.5mm Audio Port


Apple may have first removed the 3.5mm audio jack from the iPhone 7 series, but the frustration with losing the most ubiquitous audio interface ever to exist in history remains for many users with iPhone X, and presumably will carry into the future as it’s highly unlikely that Apple will ever create a new iPhone with the headphone jack ever again.

If the lack of the 3.5mm audio port and headphone jack bothers you, the only real solution is to buy a dongle adapter (or several) and take it around with you, or buy a few and leave them where you might need them; in the car, at your home and office, in a laptop bag, etc.

It’s pretty likely that the issues mentioned above will pertain to future iPhone models too, since rumors and leaks suggest that next generation iPhone models will largely look like variations of iPhone X. But those are just rumors, and anything can happen or change. – https://is.gd/gJsDJZ

❤ Can’t Save Pictures in Safari on iPhone X, iPhone 8, iPhone 7? Here’s Why!


Some newer iPhone users have discovered that they are seemingly unable to save pictures from the web in Safari to iPhone. Typically the attempt to save a web picture goes as follows; an iPhone user attempts to tap-and-hold on an image found on the web, but rather than the familiar “Save” and “Copy” menu appearing on screen, instead the image appears to float above the webpage with a little arrow atop it, and then it eventually opens in a new window with the picture. This is often the case with any image that is a link too.

Rest assured that you can continue to save images from Safari directly to an iPhone, and the method you’re already familiar with is what you’ll be using. That probably sounds confusing, so let’s explain this a bit, because newer iPhone models work slightly differently.


Why can’t I save pictures from the web to iPhone X, iPhone 8, Plus, iPhone 7 Plus, etc?


If you’re trying to save a picture from the web with Safari to a newer iPhone by using the tap-and-hold trick, and you find the picture pops up into a new screen window instead of bringing up the Save menu, the reason is 3D Touch.

3D Touch is a featured introduced a while back that allows the iPhone screen to be pressure sensitive – not just touch sensitive, but pressure sensitive too. That added sensitivity to pressure of 3D Touch makes a firmer press trigger different actions than you may be accustomed to. This applies to all newer iPhone models that include 3D Touch, including iPhone X, iPhone 8, iPhone 8 Plus, iPhone 7, iPhone 7 Plus, or iPhone 6S and iPhone 6s Plus, and presumably going forward. Older iPhone and all iPad models don’t have 3D Touch, and thus they aren’t going to find this interactivity change.


I just want to save pictures from the web to my iPhone and I don’t care about 3D Touch, how do I go back to the old way?


If you don’t like how the iPhone screen is now sensitive to pressure as well as touch, the best thing to do is disable 3D Touch on the iPhone.

  • Open the “Settings” app on iPhone
  • Go to “General” and then to “Accessibility” settings
  • Find “3D Touch” and tap on that
  • Toggle the switch for “3D Touch” to the OFF position to disable the pressure sensitivity feature of iPhone display


  • Exit out of Settings

That’s it, 3D Touch is disabled so you can save a picture using the regular old tap-and-hold Save trick.

Now go ahead and try saving a picture from Safari to iPhone again:

  • Open Safari and go to a webpage with a picture you want to save (like the one you’re reading right now, use the Shrugging Guy Emoji as a test image)


  • Tap on the image and hold your tap for a few seconds
  • Tap on “Save Image” when the menu options appear

The picture will save to your Photos app Camera Roll as usual.

With 3D Touch disabled, you can open up Safari, browse to any webpage, and try the traditional tap-and-hold trick to save a picture from the web to the iOS device, you will always see the familiar “Save” and “Copy” menu again, rather than the 3D Touch preview.

If you don’t want to disable 3D Touch, you just need to adjust how you use your iPhone slightly so that rather than pressing down, you’re simply tapping and resting on the screen without any pressure. It sounds a little confusing, but practice makes perfect.


How can I save a web picture to iPhone with 3D Touch?


The familiar tap-and-hold trick to save a picture from Safari to the iPhone still works, but the key thing to remember is that the iPhone screen is now pressure sensitive because of 3D Touch. Thus you will want to tap-and-hold as usual but not press down with any pressureon the screen itself, so it’s more like a touch-and-hold…

  • Navigate to a web picture as usual (to try this right now, we embedded a picture of an Emoji below that you can try this on)


  • Touch your finger against the iPhone screen and hold for a few seconds – do not push down with any physical pressure, just tap and rest your finger against the screen on the picture to save
  • Choose “Save Image” from the pop-up menu


If you see the picture pop-up into a new screen, you applied pressure and 3D Touch was activated instead. You have to touch the screen without any pressure. The screenshot below shows this happening with a 3D Touch preview, this is not what you want to see if you want to save a picture from the web to the iPhone:


One helpful trick for this is to adjust 3D Touch pressure sensitivity on iPhone to require a firmer press, which can help prevent accidentally triggering 3D Touch instead of the action you may have intended. Or, you can turn the 3D Touch feature off on iPhone completely as detailed above. It’s up to you.

Many users disable 3D Touch for this very reason amongst others, whether it’s because you’re not able to easily save images from the web as we describe here, or perhaps a perceived inability to delete apps from the iPhone because of 3D Touch, or perform other tasks as a result of 3D Touch triggering instead of the expected behavior, simply disabling 3D Touch will allow the iPhone to behave as it did before 3D Touch existed. 3D Touch is a cool feature, but it can be confusing to use, so often simply turning it off makes for a simpler user experience. You’ll miss out on some 3D Touch specific features, but if you weren’t using them anyway you shouldn’t miss it much. – https://is.gd/cqcRZJ

❤ How to Use Field Test Mode in iOS 11 and iPhone X


Field Test Mode on iPhone allows users to get detailed information on their cellular signal and cellular connection, and has long been a popular alternate method of displaying the cell signal on iPhones as a number instead of the signal bars or dots. Field Test Mode is undeniably for more advanced purposes, but some casual iPhone users found value in it as well in order to find a consistently reliable cellular signal.

But ever since iOS 11 and new iPhone models, Field Test Mode is different from how it used to be, and if you enter Field Test Mode in iOS 11 you will not immediately see the numerical dBm cell signal indicator replacing the bars.

Not to worry, you can continue to see the cellular signal as numbers on iPhone with Field Test Mode in iOS 11, it just works a bit differently than it did before in prior versions of system software.

Read on to learn how to access Field Test Mode in iOS 11.x on any new iPhone, including iPhone X, iPhone 8, iPhone 8 Plus, iPhone 7 Plus, iPhone 7, and others.


How to Use Field Test Mode in iOS 11 to See Number Cell Signal Strength on iPhone


The iPhone must have an active cellular connection to be able to access and use Field Test Mode to measure the signal strength, the rest is easy:

  • Open the “Phone” app on your iPhone and enter the following number exactly:


*3001#12345#*

How to enter Field Test Mode on new iPhone models


  • Press the Call button to dial the number, this will immediately launch the hidden “Field Test Mode” app on the iPhone
  • Tap on “LTE”


  • Tap on “Serving Cell Meas”


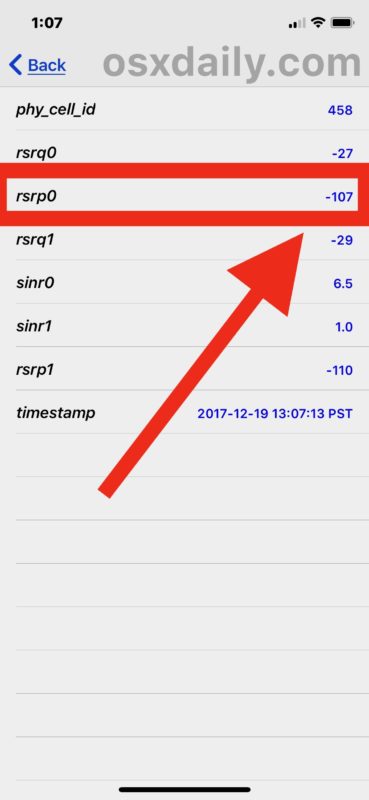
  • Look for “rsrp0” and the number corresponding will be the numerical measurement of the iPhone cellular signal strength in dBm


RSRP stands for Reference Signal Received Power and is a variation of RSSI measurement.

RSRQ stands for Reference Signal Received Quality.

Supposedly rsrp0 is the primary cell tower connected to, and rsrp1 is the next closest cell tower (or one with the strongest connection anyway), each obviously has their own cellular signal strength depending on power, connection, distance, interference, and other measures.

As for the numbers, which are measured in dBm, they will range from -40 to -130, with -40 being the best possible signal and -130 being the worst. Generally speaking, once you start approaching -110 or lower you will find the cell service is spottier and voice conversations may sound garbled or have aspects cutting out, whereas if you’re at -80 or so your signal should be pretty good and not have any issues.

Field Test Mode has a lot of data available, much of which is going to be completely useless or befuddling to the average iPhone user, much less anyone who is not a field test engineer or operator (and I am neither). For the geekier folks who are interested in numerical measurements of their cellular signal, “Serving Cell Meas” and “LTE Neighbor Cell Meas” are likely the two most pertinent sources of information, since both of those will reveal numerical cellular signals akin to what used to be displayed by default in Field Test Mode before iOS 11.


Note that accessing the dBm numerical cellular signal details may vary per iPhone model and cellular carrier, with some cellular providers not easily sharing this information through Field Test Mode. The approach above was walked through on an iPhone X with the latest iOS 11.x release on AT&T with an LTE signal, but if you want to view other GSM or UMTS signals then you’d look for the appropriate selection within the Field Test Mode app on iPhone.

And yes, at least at the consumer level, this is the only way to access Field Test Mode on the iPhone, and it has been that way for quite some time.


How do I get the signal numbers to replace the bars on iPhone X, or iOS 11?


Many users want to replace the bar signal indicator with the signal numbers instead, since the numerical reception indicator is more accurate. Unfortunately this is not possible in current versions of iOS or on the newest iPhone models with late iOS software. As of now, only iOS version before iOS 11 can use the numerical reception indicator as a replacement for the cell signal reception bars. If you want to learn how to do that on an earlier device with an older iOS release, go here to do so. – https://is.gd/NyQGx7

❤ iPhone X users love the ‘notch’

A survey shows 97 percent of iPhone X owners are satisfied with this device, including its screen cutout.


More than 90 percent of iPhone X users like the design without a Home button, according to a scientific survey. That’s good news for Apple, as most of the 2018 models are expected to use a similar form factor.

That’s not to say there’s no room for improvement. The survey also pointed several aspects of the iPhone X that responders didn’t like as much.

In the Creative Strategies survey, both the Swipe-based gesture system and Face ID scored over 90 percent satisfaction ratings. Integrating these features into the iPhone X allowed Apple to leave off the Home button and give the device a nearly edge-to-edge display.

The design requires a screen cutout to make room for the front facing camera, a feature detractors dubbed the ‘notch’. While this drew much criticism, other device companies are rushing to imitate it.

Other features of this model that did very well on the Creative Strategies satisfaction survey include the overall design, the performance, the OLED display, the rear-facing camera, and the battery life.


Creative Strategies’s survey found a general strong feeling fo satisfaction for the iPhone X.


In our study, 85 percent of iPhone X owners said they were very satisfied with the product,” said Ben Bajarin, Principal Analyst, Creative Strategies.

Still, it should be pointed out that this is a self-selected group. The analysis company surveyed only people who have an iPhone X. That leaves out all the people who refused to buy this device because they didn’t like some aspect of it.


Less satisfying iPhone X features 


The Siri voice-driven AI assistant got the lowest satisfaction rating by a wide margin, with only about 20 percent feeling safitisfied. That’s not surprising, as Siri has drawn huge criticism in recent months, but Apple seems to be working hard to improve it.

When asked “How your iPhone X feels in your hand without a case” about 87 percent of respondents feel satisfied. To enable wireless charging, this device needed a glass back, making it slippery.

Portrait mode came in with about an 83 percent satisfaction rating, while portrait selfies were near 65 percent.

The iPhone X has reportedly faced weak demand, but it’s apparently not because of the design. The other aspect of this iOS device that’s drawn vociferous criticism is the $999 price, something Creative Strategies didn’t include in its survey. Still, there are signs that Apple is going to make the 2018 models less expensive, while still keeping the features that debuted in the iPhone X. – https://is.gd/aPBOhv

❤ Fix Cellular Data Not Working on iPhone X or iPhone with iOS 11


Some iPhone users may find that cellular data is suddenly not working. The inability to transmit cellular data can seemingly happen spontaneously, and while you can typically still make or receive a phone call when this happens, you just can’t send or receive any data transmission for things like using the web, imessage, social media, or use online apps.

Obviously a cellphone is most useful when it has the capability of connecting to and using a cellular network, so if you’re experiencing an inability to use cellular data you’d be understandably perturbed.

The good news is that the vast majority of cellular data connection problems on an iPhone are easy to fix, and most incidents are just the result of accidentally toggling a setting or two (or someone else accidentally doing so, like a kid fidgeting with a parents iPhone). Let’s jump right to it and troubleshoot non-functioning iPhone cellular data.


Fixing Cellular Data Not Working on iPhone


We’re covering six main tips to get an iPhone cellular data connection working as intended. The first steps are going to apply to most people, particularly if all of a sudden the iPhone doesn’t seem to transmit cellular data.


1: Make Sure iPhone Cellular Data is Enabled


The first thing you’ll want to do is make sure that Cellular Data is enabled on the iPhone. This may sound odd and even annoying as a recommendation, but disabling cellular data or toggling AirPlane Mode on happens more often than you’d think. This is particularly true now with how the Cellular Data toggle is presented in the customizable Control Center of newer iOS releases, where it is fairly easy to hit the toggles and not realize it.


First let’s check Cellular Data:

  • Swipe open Control Center on the iPhone
  • Check to make sure the Cellular Data button is toggled on (it will be green if enabled)


Don’t be surprised if you open Control Center to discover the cellular data logo is grey rather than green, meaning that cellular data was turned off.


1b: And don’t miss checking AirPlane Mode too…


Wait! While you’re in Control Center you’ll also want to make sure that AirPlane Mode is not enabled. AirPlane Mode will disable all networking capabilities on an iPhone, including cellular data, and so if you have no data access as well as an inability to make or receive phone calls on an iPhone then AirPlane mode is the likely culprit and a good place to look. If AirPlane Mode is enabled, turn it off.

You can also check that Cellular Data is enabled through the iOS Settings app on iPhone, and check that AirPlane Mode is off too.

  1. Open the Settings app
  2. Look for “AirPlane Mode” and make sure that switch is OFF
  3. Next, choose the “Cellular” settings option
  4. Make sure the switch next to “Cellular Data” is enabled in the ON position
  5. Optional but recommended, scroll down in the Cellular settings to make sure cellular data is enabled for the app(s) you are using regularly

These two settings are the most common reason why an iPhone is not able to connect to a cellular network, transmit any cellular data, not use any networking, or if you end up with an iPhone that can make and receive phone calls but won’t use data when you’re out and about. So check for AirPlane Mode and Cellular Data settings, for the vast majority of iPhone cellular connection issues one or the other is the reason why.

The optional but recommended step above is also important for not only making sure apps you do want are able to use cellular data, but also apps you may not want. Denying some apps cellular data access can be a way to reduce iPhone cell data usage, but of course you wouldn’t want to turn that access off for apps you do want connecting to the internet.


2: Reset Network Settings & Reboot


Some network related issues can be resolved by resetting iOS network settings and rebooting. The primary downside to this is that you will lose custom network settings (like DNS entries) and wi-fi networks, meaning you’ll have to enter wifi network passwords and any network customizations again.

  1. Open the Settings app
  2. Go to “General” and then select “Reset”
  3. Tap on “Reset Network Settings” and confirm you want to reset the devices network settings
  4. Leave Settings and now reboot the iPhone

Once the iPhone has booted back up again, open an app like Safari and try to use cellular data again. It should work, assuming cellular data is turned on anyway.


3: Check iPhone for Available Cellular Carrier Updates


Cell network providers will occasionally offer carrier updates, and though it’s unlikely that avoiding these updates would cause a network issue, it won’t hurt to check and install any carrier updates if they’re available.

  1. Open Settings app and go to “General”
  2. Select “About”, if a carrier setting update is available a popup on screen will appear and you can install it

4: Update iPhone System Software to the Latest Version


A generic but worthwhile troubleshooting step is to check for an install any iOS system software updates if they’re available for the iPhone. When you update iOS there are various system maintenance tasks performed under the hood, and sometimes that can resolve quirky issues. And it’s good practice to install the latest iOS release on most iPhone models anyway:

  1. Back up your iPhone to iCloud or to iTunes, or to both
  2. Open the “Settings” app and go to “General”
  3. Choose “Software Update” and if you see an update to iOS available, install it

Alway be sure to backup an iPhone before installing any iOS software update.


5: Contact Your Cellular Provider


If you have tried all the trouble shooting steps possible but the iPhone is still not able to connect to a cellular network, you may have an issue with your cellular provider. Maybe the network is down, maybe you forgot to pay the bill, maybe some other issue is preventing your iPhone from joining the cell network. – https://is.gd/69yFkt

❤ iPhone X Ringer Volume Very Low? Here’s the Fix


Have you noticed the iPhone X ringer volume goes from loud to low? Often iPhone X users notice that the iPhone X ringtone will sound very quiet after initially sounding loud, but despite pressing the volume up buttons they can’t get the iPhone X ringtone to sound loud again, it’s just stuck quiet. Don’t fret and there’s nothing wrong with your iPhone X for exhibiting this behavior, in fact this is actually a feature.


If your iPhone X rings loud but then gets quiet and stays quiet, but you’d rather have the iPhone X ringer volume stay loud all the time when getting a call, read on to learn the proper settings adjustment to stop this behavior. The end result will be that iPhone X sounds loud on incoming calls all the time and the iPhone X will stop quieting the ringtone volume itself.

What causes the iPhone X ringtone volume to be very low after initially sounding loud? It’s actually a Face ID feature. And yes, this ring sound volume lowering capability applies even if Face ID is not being used on iPhone X to unlock or authenticate the device, and much like how Animoji uses the Face ID camera to scan your face even if you aren’t using Face ID authentication, the front camera for face scanning is active for other features too, and that includes the ringtone volume.


How to Stop iPhone X Ring Volume Going Quiet


You can disable the attention awareness feature that scans your face and determines you’re looking at the iPhone X, which in turn lowers the ring volume on the device. With this feature turned off, the iPhone X will stop lowering the ring volume of calls automatically when you pick up the iPhone and look at it.


  • Open the “Settings” app on the iPhone
  • Go to the “Face ID & Passcode” section
  • Locate the “Attention Aware Features” option and turn the switch to the OFF position
  • Exit out of Settings


You can confirm this works by getting an incoming call on iPhone X, it should now be loud as your settings were set to beforehand and no longer quiet the call to a very low volume automatically.

Another helpful step is to make sure your iPhone ringer volume is turned up all the way to the loudest setting, since sometimes users have inadvertently made the iPhone volume low.


How to Turn Ringer Volume Up to the Loudest Setting on iPhone X


Here’s how to adjust the Ringtone Volume so that it is up all the way to a loud setting:

  1. From the “Settings” app go to “Sounds & Haptics”
  2. Under the ‘Ringer and Alerts’ section slide the volume indicator all the way to the right for full volume
  3. Optionally, toggle the switch for “Change with Buttons” if you want to be able to adjust ringtone volume with the physical buttons on the iPhone*

* Some people turned this Volume button adjustment feature off long ago, particularly if they have kids that like to fidget with their iPhone. But many new iPhone models ship with this feature disabled by default. Whether you want to adjust the ringtone volume by the volume buttons is a matter of personal preference and your individual usage.

Finally the other options to make sure are not enabled is the physical hardware mute button on the side of the iPhone (if you can see the little orange indicator, mute button is on), and also check for Do Not Disturb not being enabled, since Do Not Disturb mode will cause an iPhone to not get incoming calls or make sounds at all.

Keep in mind that if you press the volume buttons on an iPhone when a call is actively incoming, you will mute the incoming call sound on the iPhone just temporarily for that specific individual phone call. That’s a completely separate feature and it’s quiet useful if you’re in a meeting or talking with someone and you want to quickly silence just that single call without muting the phone entirely.

That should cover all the bases, and your iPhone X should now ring loud for incoming calls as usual just like other iPhones do. No more automatically quieting down after the first ring, as long a you have the facial attention awareness feature off this behavior will stop. – https://goo.gl/vypZGz

❤ How to Delete Apps from iPhone X and 3D Touch iPhone Models


Removing apps from an iPhone or iPad has always been an easy endeavor, and you can easily uninstall any iOS app from a device in just seconds. Of course iPhone X and 3D Touch iPhone models can still quickly delete apps from the home screen too, but because of some hardware features of those devices, deleting apps may appear like it works differently. Some users may attempt to delete an app on iPhone X or other 3D touch iPhone models and find that no “X” appears at all, or that the icons don’t jiggle, or that they feel a little buzz sensation and then find a pop-up menu instead of the “X” button to delete an app.

This guide will walk through how to delete apps on the newest iPhone models, including understanding how deleting apps works on iPhone X, and also offer some general tips on deleting apps on any other iPhone with a 3D Touch screen.


How to Delete Apps on iPhone X


Deleting apps from iPhone X can still be done from the Home Screen, and rather quickly, but there’s a few minor differences. Here’s how the complete process works on the devices without a Home button:

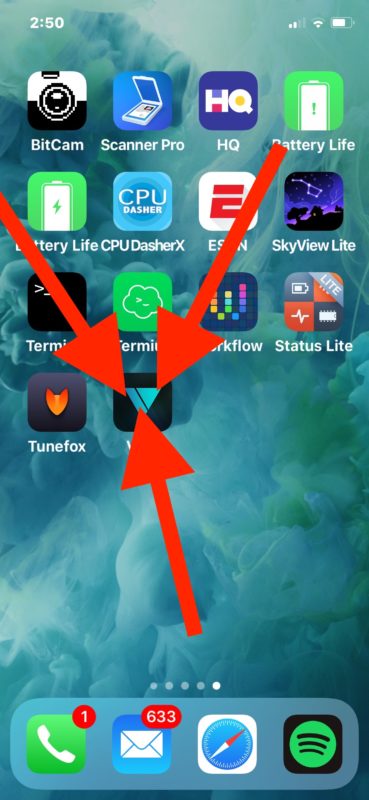
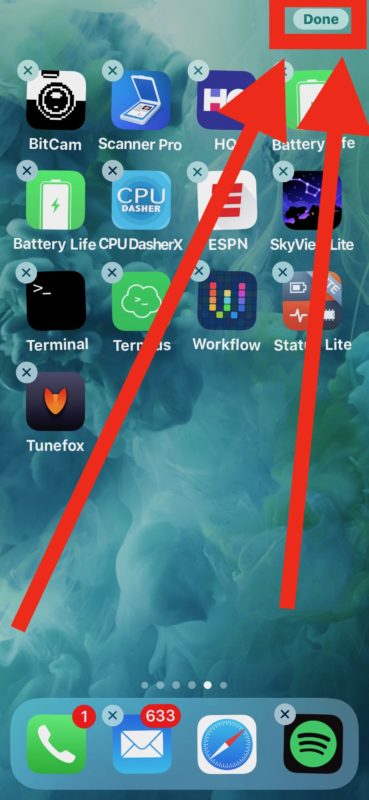
  • Tap and hold down on an app icon for an app that you want to delete from iPhone – do not press with any pressure *


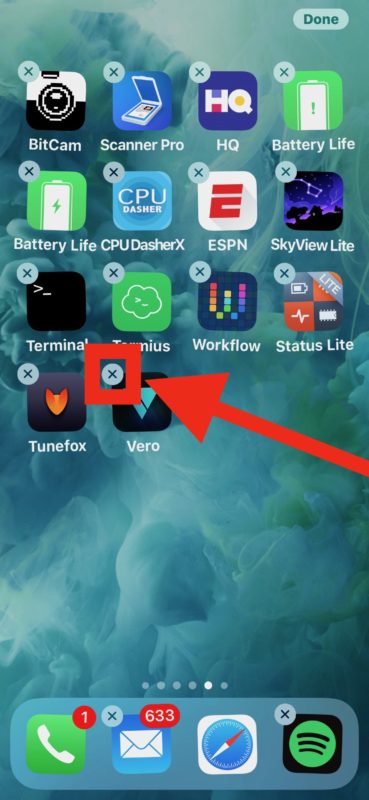
  • After the app icons start to jiggle, tap the (X) button that appears in the corner


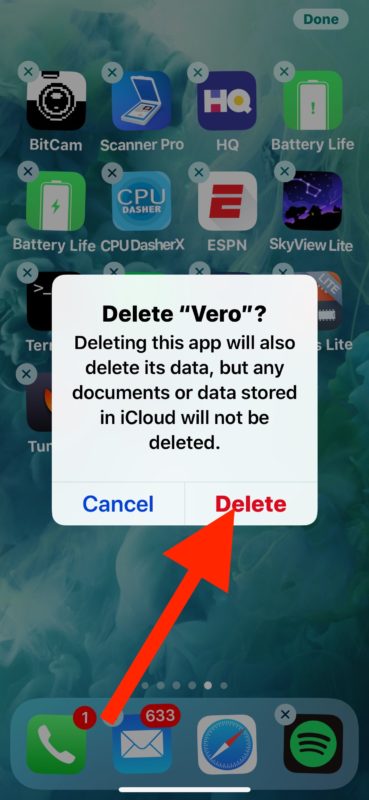
  • Confirm that you want to delete the app by tapping the “Delete” button on the ‘Delete app’ pop-up dialog


  • Repeat with other apps if desired by also taping their “X” over on the app icon, and confirm deletion as necessary
  • When finished, tap the “Done” button in the upper right corner of iPhone X screen next to the notch, or swipe up from the screen bottom to mimic a Home button


Perhaps the primary difference with deleting apps on iPhone X versus other models is that there is no Home button to exit the app deleting mode, where icons are wiggling and jiggling. Instead you either mimic the Home button to exit Delete / Move mode, or you hit the “Done” button in the corner of the iPhone X display next to the notch.

The other main difference in deleting apps on newer iPhone models applies not only to iPhone X, but also to all other iPhone displays with 3D Touch capability. We’ll discuss that separately since it has become a major point of confusion for some iPhone users.


How to Delete Apps on iPhones with 3D Touch Displays


* The 3D Touch feature can cause some confusion and frustration when trying to delete apps from iPhone models with 3D Touch screens. If you 3D Touch many app icons on iPhone, a little submenu of options for that app shows up, but no Delete option or no “X” button appears.

It is very important to just tap and hold on the screen to activate the app icon jiggle mode, do not physically “press” down with pressure otherwise you will activate 3D Touch on the iPhone display.

This 3D Touch press feature alone leads to a lot of confusion about deleting apps, not just on iPhone X but also other 3D Touch equipped devices like iPhone 8, iPhone 8 Plus, iPhone 7, iPhone 7 Plus, etc.


Here’s how the deletion of apps works on iPhone with 3D Touch screens:

  1. Find the app icon you want to delete on the iOS Home Screen
  2. Tap and hold on an iPhone icon that you want to delete – do NOT press down with any physical pressure on the screen otherwise you would activate 3D Touch instead
  3. Tap the “X” button to delete the app, then confirm you wish to delete the app at the dialog alert
  4. Press the “Home” button to exit Delete Mode, or swipe up from the bottom of the screen if iPhone supports that gesture as a Home button replacement


3D Touch has a lot of great features available to it, but it can also be a confusing feature in and of itself if you don’t quite understand how it works or how sensitive it can be. You may find it helpful to adjust 3d Touch sensitivity on the iPhone display.

The big thing to remember with any 3D Touch equipped iPhone is that if you’re trying to simply delete an app, or even move one around the screen, you can not physically press down on the screen. Physically pressing down on the display activates 3d Touch. Just lay a finger on the app icon with zero pressure instead.

If you can’t quite figure out how this 3D Touch approach works, you can also choose to disable 3D Touch on iPhone models with the screen feature, which will allow for a more forgiving experience when trying to delete apps (or move them around on the Home Screen) because the display will no longer be pressure sensitive.

Note this particular approach only applies to select newer iPhone models (for now anyway) since the current iPad line still has a Home button, and also doesn’t have 3D touch. On iPad models and any other iPhone with a Home button or without 3D Touch, or with 3D Touch disabled, you can use the regular iOS app uninstall method without thinking about screen pressure, or Home button gestures.

And in case you were wondering, the methods outlined above works the same to delete any third party iOS apps as well as deleting default apps from iOS too. – https://goo.gl/7SPVY7

New Apple Commercials Show Off iPhone X Portrait Lighting and iPad Pro

Apple is running a handful of new commercials, one for iPhone X, and two additional commercials for the iPad Pro.


The new iPhone X ad focuses on the devices Portrait Lighting camera feature, which uses software to attempt to mimic various portrait lighting effects that you’d typically associate with studio lighting scenarios.

The new iPad commercials are shorter clips, one demonstrating taking notes with an Apple Pencil, while the other demonstrates so-called augmented reality apps.

The commercials are airing on television and around the web now, and have been embedded below for easy viewing:

iPhone X – A New Light

The iPhone X ad titled A New Light focuses on the Portrait Lighting feature, while a song called “D.Y.T. (Do Your Thing)” by NVDES & REMMI is the soundtrack to the commercial.


iPad Pro – Take notes

The first iPad Pro commercial shows a younger person doodling and taking notes on their iPad Pro using an Apple Pencil.


The song playing as the soundtrack is called “Go” by Louis The Child.

iPad Pro – Augment Reality

The next iPad Pro commercial, titled Augment Reality, demonstrates apps that use the devices camera to augment the real-world scene as seen through the display.


The Augment Reality iPad Pro commercial also features the song “Go” by Louis The Child.

There are other Apple commercials airing concurrently as well, featuring the iPhone X, Animoji, Face ID, and much more. – https://goo.gl/JSR5o5

How to Use Animoji on iPhone X


Animoji is one of the major new software features available on iPhone X. For the unfamiliar, Animoji are animated cartoon renditions of things like a smiling pile of fecal matter, a unicorn, dog, cat, chicken, panda, pig, fox, alien, and other figures, and the Animoji feature works by using the Face ID front-facing iPhone camera to see how your face is changing and mimic those facial expressions on the animated character. You can then record little snippets of Animoji and send them to people, leading to messages that include something like a talking animated unicorn or talking animated pile of feces.

This thrilling new Animoji feature is easy to use, but it’s also easy to overlook. That’s because Animoji capabilities are built into the Messages app of iPhone and is, currently anyway, not a separate application. Thus, to create and use Animoji, you must start from the iPhone Messages app. The tutorial below walks through how to use Animoji on the iPhone X.


Animoji is only available on the latest and greatest iPhone X models with Face ID, the feature is not available on earlier iPhone models, it must be iPhone X (or newer). Animoji is not available on iPhone 8, iPhone 7, iPad, or earlier iOS device models.


How to Use & Send Animoji on iPhone

Ready to make and send an Animoji? Here’s how it works:

  • Open the Messages app on iPhone X


Messages


  • Open a message thread with a person you want to send an Animoji to
  • Tap on the Apps button, it looks like an “A” made out of popsicle sticks


How to use Animoji on iPhone


  • Tap on the Monkey icon, it looks like a cartoon monkey face with it’s mouth open


How to use Animoji on iPhone


Swipe up or down on the left-side Animoji character icons and choose your animoji:

  • unicorn
  • chicken
  • mouse
  • dog
  • cat
  • pig
  • panda
  • smiling pile of feces
  • fox
  • alien
  • ghost


How to use Animoji on iPhone


  • Look at the iPhone and make a face or shift your head and facial expression to see how the Animoji on screen adjusts
  • When ready to record an Animoji video tap the big red button in the corner to start to record an animoji sequence


How to use and record Animoji on iPhone


  • Talk and make faces as you want to, the Animoji character will adjust, tap the red stop button when finished creating your Emoji recording
  • Tap the blue arrow button to send the animoji to the recipient via Messages


How to send Animoji on iPhone


The recipient will receive a short video clip of the Animoji.

For example, here’s an Animoji of the smiling feces that is mimicking the human facial expressions as seen through Face ID camera on the iPhone.


Animoji includes an Animated poop emoji as an Animoji character


If the recipient of the Animoji has an iPhone X or newer model device, the animoji will appear as an integrated looping video.

If the recipient of the animoji has a Mac or earlier iPhone or iPad model, the animoji recording will arrive like any other video in a .mov file format.


Can you save Animoji video messages?

Yes. The Animoji recording will default to staying in your Messages app unless it is deleted.

Additionally, you can manually save an animoji like you would save any other image or video from iOS Messages or with Mac Messages.

(A quick side note; the Animoji recordings are not animated gifs by default, but you can easily convert the Animoji to GIF by using Drop To Gif or similar video to GIF conversion tools).


Can you use Animoji without using Face ID?

Yes, you can use the Animoji feature with facial recognition even if you do not use Face ID on iPhone X.

If you have an iPhone X you have perhaps already used the Animoji feature, or at least seen it sent from someone else, or perhaps even on TV. The Animoji feature has been demonstrated in Apple commercials (embedded below) has surfaced in a wide variety of popular videos elsewhere on the web.


Have fun with Animoji, they’re sure to be a prominent inclusion in future iPhone and iPad software, much like Messages Stickers, Messages apps, emoji icons, and the other busy and goofy features bundled into the iOS Messages app. – https://goo.gl/bJ4Ezi