❤ PDFelement 7: The Best PDF Editor for Mac Gets Even Better


In the past, we’ve told Apple World Today readers about PDFelement, a powerful tool for creating, editing and annotating PDF documents. The app is developed and supported by Wondershare, which has recently released PDFelement 7, the latest generation of this popular software. Download a copy today to see why PDFelement is the most popular PDF editor on the Mac App Store.

The free trial evaluation copy of PDFelement adds a watermark, but otherwise functions identically to the paid version.


Why PDFelement?


The fact that PDFelement is the best-selling PDF editor in the world is one reason why you should consider this app for your PDF needs, but there are more reasons than that. It’s also less expensive than its competitors, with volume licensing and educational discounts available. The app is easy to install and set up — using the power of the Mac App Store — in minutes.

Activation of the Pro features of PDFelement 7 is done through registration and a simple in-app purchase. Flexible licensing with either perpetual license ownership or yearly plan leasing is available.


What’s New In PDFelement 7


PDFelement 7 builds on the power and success of PDFelement 6, and now is even easier to use with an all-new user interface. Securing, modifying and sharing documents is now much more simple to accomplish.

Launch PDFelement 7 for Mac and you’ll see a clean interface with a list of your most recent documents. All those documents are one click away from editing, annotating, and sharing.


During testing of PDFelement 7 for this article, we found the page menu display (see image above) to greatly speed up the process of reordering pages in a PDF file. The pages of a document are presented in a grid format, and the user can then drag and drop images to reorder them or rotate them to change orientation.

Behind the clean, intuitive user interface of PDFelement 7 is a set of features that is ready for any size business, whether a one-person operation or large enterprise. Adding or changing headings and footers, editing text, and other document modifications are done much faster than in the previous version. Customized annotations and Bates numbering are now part of the new PDFelement.

Now that we’ve looked at the new features of PDFelement 7, let’s take a look at what it can do for you.


PDF Creation


For many people, it all starts with creating new PDF files for distribution to customers, readers or friends. You can actually create new PDFs from a scanner. Take an existing paper form, scan it, and then perform optical character recognition (OCR – a feature of PDFelement Pro) to either generate editable text or make a searchable text image.

Want to archive old documents by scanning them into PDF files? PDFelement can save PDF files in the PDF/A format that is designed especially for archiving and long-term preservation of electronic documents. It does this by embedding all of the information required to display the document in its original form into the PDF file.


Whether you’re using PDFelement on Mac or Windows, you get the same functionalities and experience, making it easy to support users in cross-platform environments. It also supports ten separate languages — English, French, German, Spanish, Russian, Portuguese, Italian, Japanese, Dutch and Chinese. This feature alone makes PDFelement indispensable in global enterprises.


PDF Editing


PDFelement 7 for Mac makes editing PDF documents simple. Whether the text inside a PDF requires editing, or it’s the images, pages, links, backgrounds, watermarks, headers or footers that need a fix, PDFelement has the tools you need to make a PDF perfect.

For text, PDFelement has both paragraph and single-line editing modes, with font type, size and style being easily adjustable. Images are just as easy to edit. Need to add, copy and paste an image? Consider it done! How about extracting an image from an existing PDF to be used in another document? It’s easy with PDFelement. Cropping and rotating images takes no time and effort at all.


PDF Annotation And Sharing


When you’re working on a group project, PDF annotation tools are a must. PDFelement’s toolset gives editors the ability to add fills, highlight text, draw on images and text, create and use stamps, and leave comments for future reference or rework.


Sharing sensitive PDF content can expose data to others and create privacy issues. That’s why PDFelement has the ability to lock down PDF content with passwords and permissions. Your documents can be shared immediately to Dropbox or Google Drive, or sent to others through email and messaging.

Should you need to pull data from PDF forms into a spreadsheet for analysis, PDFelement is there to turn a slow manual process into a speedy and automated batch process.


Try PDFelement 7 For Mac Today


Remember, PDFelement 7 for Mac is free to try. Just download a copy from the Mac App Store, and within minutes you’ll be trying out the world’s most popular PDF editor.

Wondershare also makes PDFelement versions for iPhone and iPad, the perfect mobile companion to the Mac version. You’ll be able to create, edit, annotate and share PDFs from anywhere.

https://is.gd/9kkrQW

❤ MacOS bug in Image Capture


The Image Capture app comes pre-installed with every Mac, allowing users to easily import photos and videos from other devices.

How Apple is filling your hard drive with empty data.

Apples Image Capture.app is a very nice and simple tool to transfer photos from attached cameras to your Mac without the need to use heavy and slow launching apps like Apples “Fotos.app”.

Most unfortunately, in every single release since Mac OS X 10.10, Apple has added a lot of very embarrassing bugs to Image Capture.

Some of them got quickly fixed after we told Apple about them, but at the same time, Apple was very busy adding new bugs.

By pure chance, we have discovered a very disturbing bug recently that is able to quickly fill your macOS volumes with empty data.

Here is what happens.

If you connect an iPhone or iPad to your Mac, and use Image Capture to transfer the photos you took with the device to the Mac, you have the option to convert the HEIC photos taken by iOS to more standard JPG files. This requires you to uncheck the “Keep Originals” option in the settings for that iOS device, as shown here.


More specifically, the issue only affects users who import photos from an iPhone or iPad using Image Capture. Let’s say you want to manually transfer photos from your iPhone to a Mac via USB, and your photos are saved with the High Efficiency option (which is basically the HEIF format).
By unchecking the “Keep originals” option, macOS converts all HEIF image files to JPG automatically as you might expect.

The problem discovered by the NeoFinder team is that the Mac adds 1.5MB of empty data to each converted photo, making the imported files larger for no reason. By looking inside these photos through a Hex-Editor, you can find a section full of zeroes, which results in unnecessarily larger files.

With that said, if you import 1,000 images from your iPhone or iPad to your Mac using the Image Capture app, the bug will take up an additional 1.5GB of storage — which can be a lot for someone who owns a MacBook with 128GB of storage.

Apples Image Capture will then happily convert the HEIF files to JPG format for you, when they are copied to your Mac.
But what is also does is to add 1.5 MB of totally empty data to every single photo file it creates!

We found that massive bug by pure chance when working on further improving the metadata editing capabilities in NeoFinder, using a so-called Hex-Editor “Hex Fiend“.

Here is how the end of every single JPG file created by Apples buggy Image Capture.app looks like:


Apple has already been notified about the problem, but we don’t know when the company plans to release a macOS update to fix that bug. Until then, users can try the latest beta version of the Graphic Converter app, which removes the unwanted empty data from the JPG files. Of course, this is a colossal waste of space, especially considering that Apple is seriously still selling new Macs with a ridiculously tiny 128 GB internal SSD. Such a small disk is quickly filled with totally wasted empty data.

With just 1000 photos, for example, this bug eats 1.5 GB off your precious and very expensive SSD disk space.

We have notified Apple of this new bug that was already present in macOS 10.14.6, and maybe they will fix it this time without adding yet additional new bugs in the process.

https://is.gd/yMUXj8

❤ New iPad Pro gets privacy feature from Apple’s MacBooks


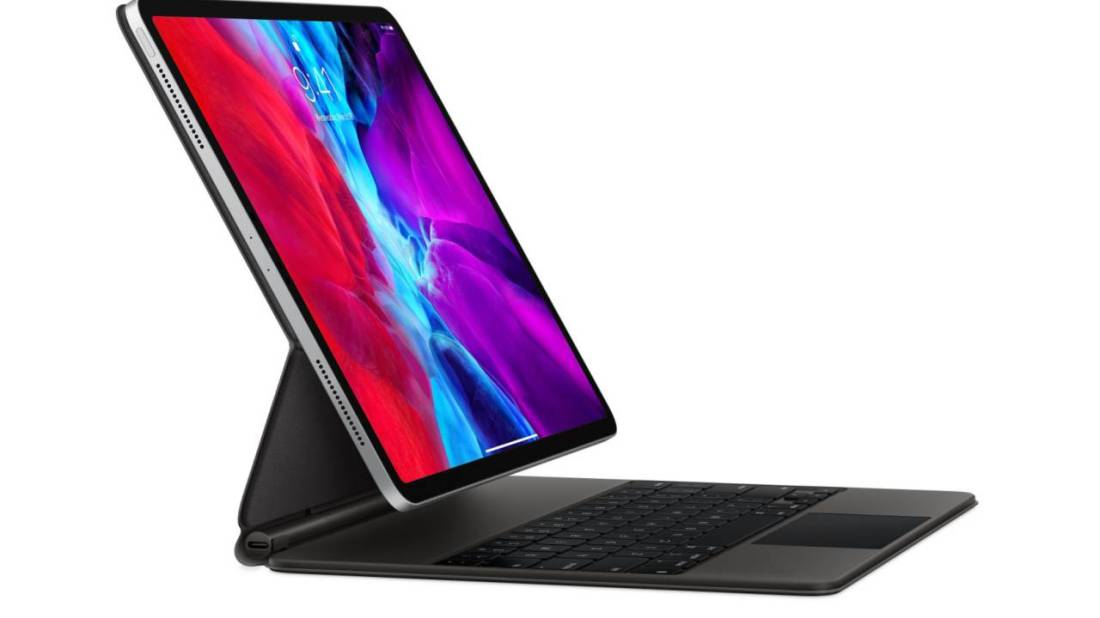
Apple quietly added a new privacy feature to the latest iPad Pro, borrowing a MacBook security feature to help prevent eavesdropping on its 2020 tablets. With the launch of the 2018 MacBook range and the introduction of the Apple T2 security chip, closing the lid of the notebooks automatically disconnects the hardware microphones.

That way, in addition to the webcam obviously being covered, it means extra reassurance that apps and services aren’t secretly listening in through the microphones. Turns out, Apple has decided to so the same thing for its most expensive tablets, too.

An updated version of the Apple Platform Security document details the change. “iPad models beginning in 2020 also feature the hardware microphone disconnect,” it explains. “When an MFI compliant case (including those sold by Apple) is attached to the iPad and closed, the microphone is disconnected in hardware, preventing microphone audio data being made available to any software—even with root or kernel privileges in iPadOS or in case the firmware is compromised.”


As the document makes clear, you’ll need a specific type of case in order for this to work: one with MFI certification. That obviously means Apple’s own cases, like the Smart Keyboard Folio currently available and, come May, the new Magic Keyboard for iPad. However there are plenty of third-party cases that are also MFI compliant.

Logitech, for instance, has several keyboard cases that work with the iPad Pro if you want easier text entry than the iPadOS on-screen keyboard. Alternately, if you don’t need the physical keyboard – and the thickness that brings – there are cases from Otterbox, for example, that will lock and unlock the iPad Pro when closed and opened. They’ll also trigger the new hardware microphone disconnect in the process.

Digital eavesdropping has been long been a concern, but attention has ramped up in recent weeks as more people rely on devices like iPads to work from home. Video calling apps like Zoom have found themselves suddenly popular outside of their traditional enterprise audience, but that surge in users has also helped highlight security shortcomings. While Apple does have its approvals process to try to ensure software which makes it to the App Store isn’t also quietly tapping into hardware it shouldn’t, hardware disconnect for the microphone on the iPad Pro is another step for those particularly concerned about privacy. – https://is.gd/Yj4zgo

❤ How to Change Refresh Rate on Mac Displays

How to change Mac display refresh rate


Changing the refresh rate of a display can be needed by some Mac users, particularly if they work with movie files and video editing. Generally speaking, most users should keep their displays set to the default refresh rate for their particular screen, but if you need to adjust refresh rate you’ll find it’s simple to do so with displays used on the Mac.

It’s important to note that not all Mac displays can change their fresh rate, though many third party external screens offer different refresh rate options. In fact, most Mac internal screens can not change refresh rates for those built-in displays, though that is changing with some of the Pro models.


How to Change the Refresh Rate on MacBook Pro Display


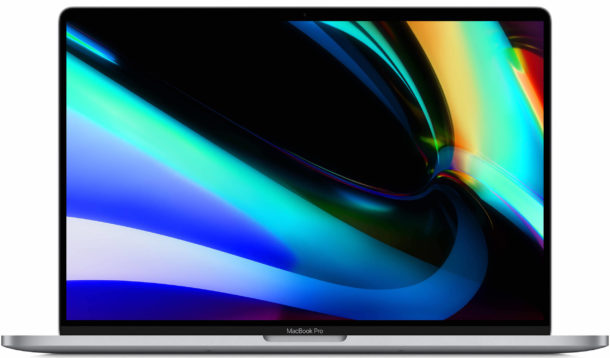
For the latest MacBook Pro 16″ and newer models, and the Apple Pro XDR display, you can adjust the Mac refresh rate as follows :


  • Pull down the  Apple menu and choose ‘System Preferences’
  • Go to “Displays”
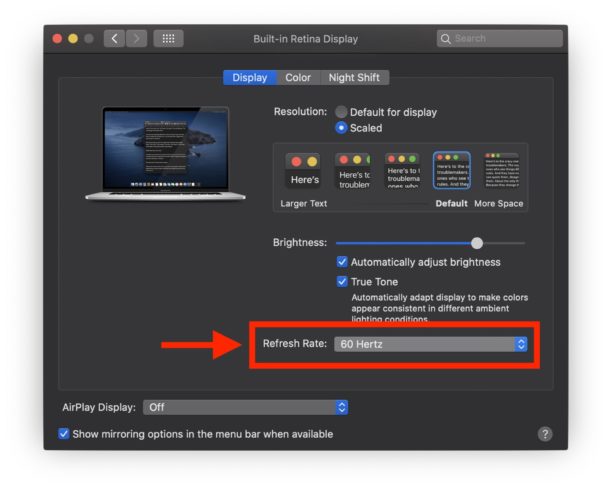
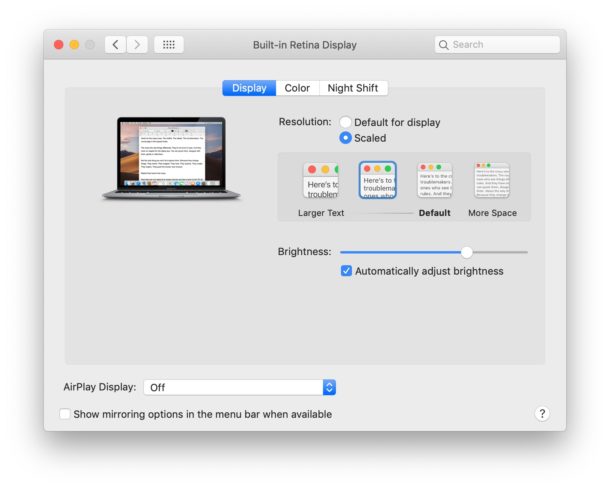
  • Under the ‘Display’ tab, hold down the OPTION key and click on the “Scaled” button to reveal the “Refresh Rate” options


How to change refresh rate on Mac display


The default option is 60 hertz for most displays, which is recommended to maintain.

For example, the 16″ MacBook Pro has multiple refresh rates available on the built-in display, including 47.95 hertz, 48 hertz, 50 hertz, 59.94 hertz, and 60 hertz.

You can also change the screen resolution of Retina Macs in the same settings menu if you choose to, whether to increase text size and size of stuff on the screen or to get more screen real estate. Much like refresh rate, it’s generally recommended to use the native screen resolution on a display for best results.


How to Change Refresh Rate on External Mac Displays


Some external displays can also change their refresh rate easily, here’s how you can do that :


  • Connect the external display to the Mac if it’s not connected already
  • Pull down the  Apple menu, and choose ‘System Preferences’
  • Go to “Displays”
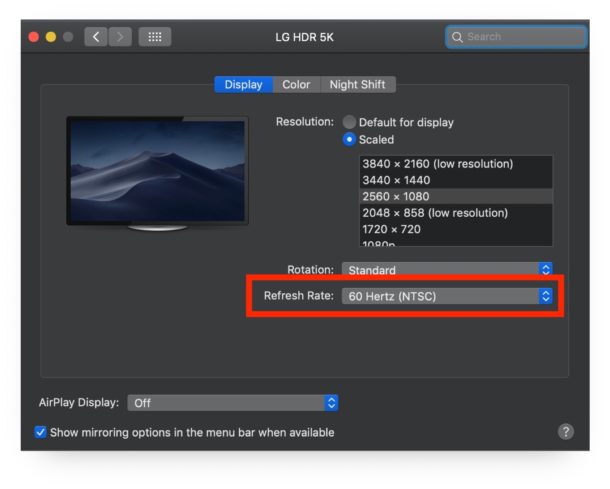
  • Under the ‘Display’ tab, hold down the OPTION key and click on the “Scaled” button to reveal the “Refresh Rate” options for that display


How to change the refresh rate on external Mac display


Some displays may even show the refresh rate drop-down menu options without having to hold down the OPTION key, but that partially depends on the version of MacOS and the display itself too.


Why don’t I see an option to change refresh rate on Mac display?


If you don’t see the option to change refresh rate on the Mac display, it’s either because your display does not support changing refresh rate, or you forgot to hold down the OPTION / ALT key while you were choosing the Scaled resolution button.

If your Mac does not support different refresh rates on the internal display, you’ll see the standard settings screen for Display preferences :


Unable to change refresh rate on Mac display


If you know the display should have the option but you are encountering issues, you may try disconnecting it, reconnecting it, and using the Detect Displays trick, which sometimes can resolve curious issues with display resolution, refresh rate, and other unusual display behavior.

As mentioned before, if you do change the refresh rate of a display you’ll likely want to switch it back to the default once you’re finished using the different setting while editing video or for whatever other purpose you adjusted the setting for. – https://is.gd/bshmAu

❤ How to Setup and Use iPhone as iTunes Remote PC and Mac

How to Setup & Use iPhone as iTunes Remote


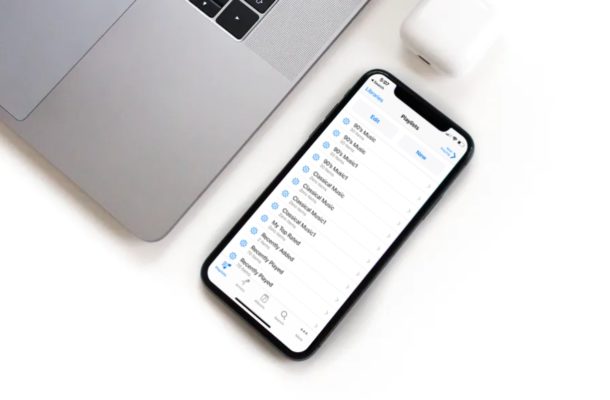
Did you know that you could use your iPhone as a remote to control your iTunes library? If you regularly use iTunes on your Windows PC or Mac for listening to music or playing back content purchased from the iTunes Store, this feature will prove to be extremely useful.

Let’s say you’re away from the keyboard and you’re busy doing something else in the next room. You could use your iPhone to switch between songs in your library and continue listening without even having to move. Although this article focuses primarily on the iPhone, you could also use your iPad or iPod Touch to remotely control your iTunes library.

Are you interested in learning how this works, so you can set it up on your iOS device? Then you’re in the right place, because we’ll be discussing how you can set up and use your iPhone or iPad as an iTunes Remote on both the PC & Mac.


How to Setup & Use iPhone as iTunes Remote


In order to successfully connect your iPhone to iTunes on your computer, you need to make sure that both of the devices are connected to the same Wi-Fi network. You’ll also need to download and install the iTunes Remote app from the App Store. Once you’re ready, simply follow the steps below to set up and start using your iOS device as a remote control.


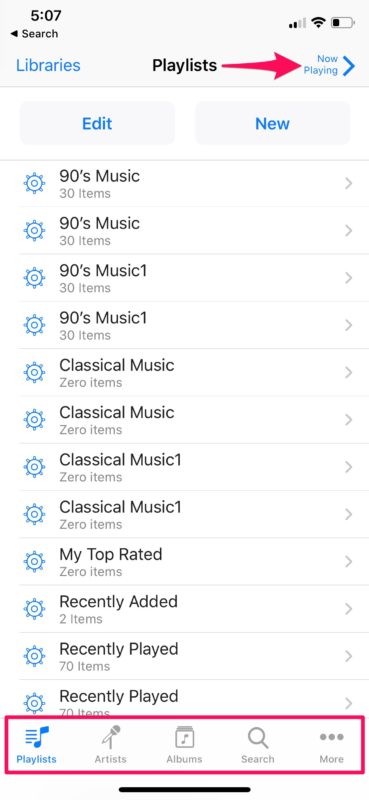
  • Open the “Remote” app from the home screen of your iPhone, iPad or iPod Touch. It will be indicated by the icon shown below.


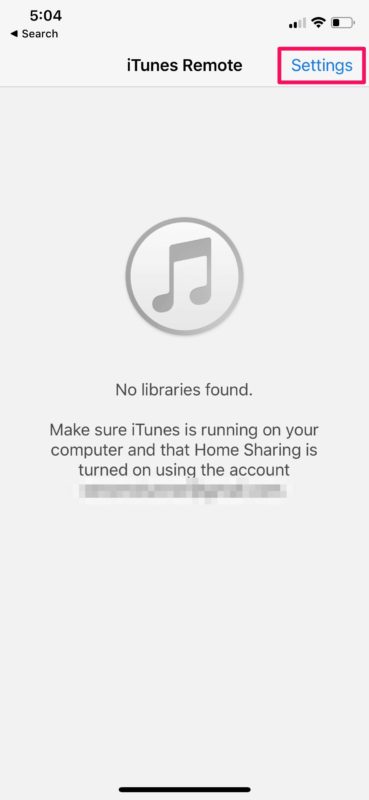
  • Tap on “Settings” at the top-right corner of the screen.


How to Setup & Use iPhone as iTunes Remote


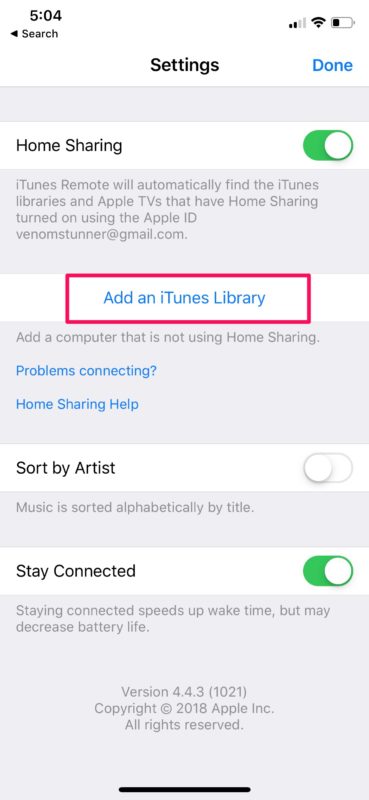
  • Now, press “Add an iTunes Library” as shown in the screenshot below.


How to Setup & Use iPhone as iTunes Remote


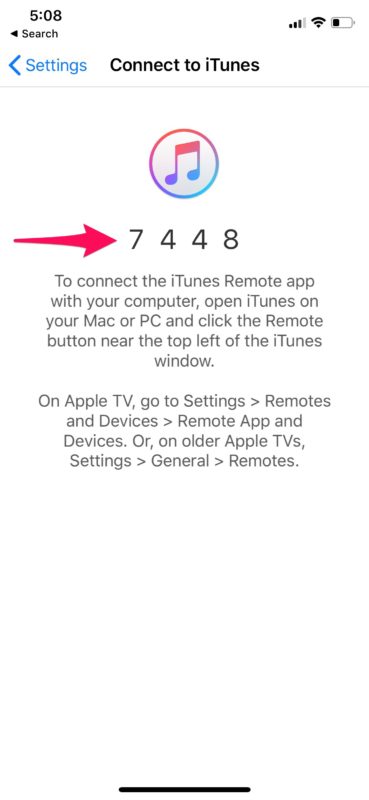
  • The app will now display a 4-digit code that you need to manually enter in the iTunes desktop client.


How to Setup & Use iPhone as iTunes Remote


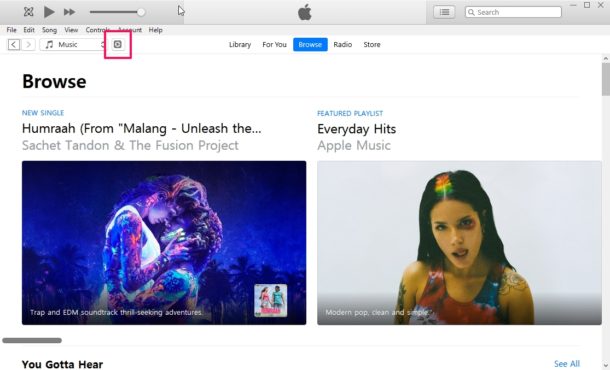
  • When you open iTunes on your computer, you’ll notice a tiny remote app icon right next to the music category, as shown below. Click on it to continue with the setup.


How to Setup & Use iPhone as iTunes Remote


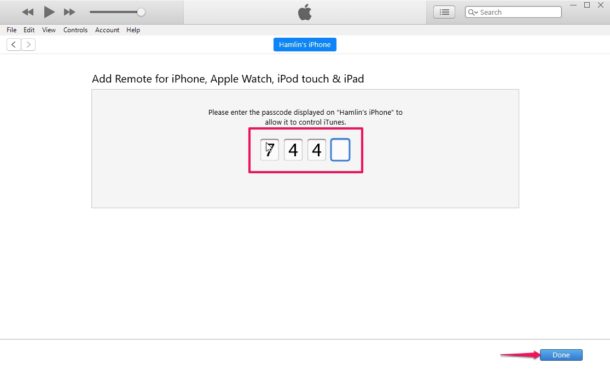
  • Now, simply type in the 4-digit code and click on done.


How to Setup & Use iPhone as iTunes Remote


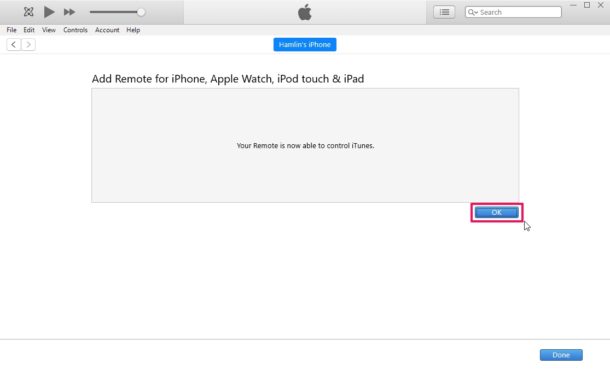
  • iTunes will now indicate that your device has successfully connected and paired with iTunes.


How to Setup & Use iPhone as iTunes Remote


  • To start using the Remote app, tap on your iTunes Library within the app, which is usually indicated the username that you have on your computer.


How to Setup & Use iPhone as iTunes Remote


  • Now, you’ll be able to navigate through the menus just like you normally would on iTunes, and control what’s being played back on your computer.


How to Setup & Use iPhone as iTunes Remote


If you followed along you’re now set up to start using your iPhone, iPad or iPod Touch as an iTunes Remote with a Mac or Windows PC.

In addition to being able to control music and video content that’s stored in your iTunes library, you will also be able to edit and create new playlists which will automatically be updated in the desktop client immediately.

Since this is a wireless feature, you might be concerned about any sort of latency issues. However in our testing, the latency was very minimal and wasn’t really noticeable in most cases. That being said, the latency might heavily depend on the Wi-Fi range, so make sure you’re not too far away from the router.

This may be more useful on Windows PC and older Mac system software at this point since the latest versions of MacOS have deprecated iTunes, but the Music app still allows for similar capabilities on Mac.

Speaking of remote control, are you trying to remotely install apps on your iPhone using iTunes? Well, you don’t need iTunes Remote for that, as that’s a completely different capability. You simply need to make sure that you’re logged into the same Apple ID on both your device and iTunes and have the proper setting configured to have that feature work. – https://is.gd/ltMYzw

❤ How to Delete iPhone and iPad Backups from MacOS Catalina with Finder

MacOS Catalina, iPadOS 13, and iOS 13


Need to clear up some disk space or get rid of some old iPhone or iPad backups on a Mac? With the latest versions of MacOS, managing iOS and iPadOS device backups is done entirely in Finder, including deleting and removing device backups.

Arguably the safest and most thorough way of backing up an iPhone or iPad is to do an encrypted backup via Mac Finder. When the backup is complete you’ll have a copy of all of your data on your computer, complete with encrypted keychain contents. But it all takes up space that you might want to reclaim. As you can imagine, doing a full backup of your iPhone or iPad can take a lot of space. That’s fine if you’re lucky enough to be using a Mac with a multi-terabyte SSD. But most of us aren’t, so we need a way to trip the amount of data used by backups. We need to delete old ones. And in macOS Catalina, that’s a whole new process compared to deleting backups with iTunes. As you’ll see, removing backups this way is similar, but since iTunes is no more in modern macOS versions, it’s obviously a bit different and using a different process.

Here’s how to go about deleting old iPhone or iPad backups in macOS Catalina.


How to Delete iOS & iPadOS Device Backups from MacOS Finder in Catalina


This assumes you have made a backup of iPhone or iPad to macOS before, if not there will not be any backup to remove.


  • Plug your iPhone or iPad into your Mac using a USB cable.
  • Open a Finder window by clicking its icon in the Dock and click your iPhone or iPad in the sidebar.
  • Make sure that the “General” tab is selected and then click “Manage Backups.” You’ll find it at the very bottom of the window.


Click manage backups


  • Click to select the backup that you want to delete and then click “Delete Backup.”


  • You’ll need to confirm that you want to delete the selected backup before the action is carried out.


The selected backups will be deleted.

Depending on the size of the device backups you removed, you can possibly get a ton more space on your Mac drive, whether it’s a hard disk or SSD, just by removing backups this way. This is particularly nice to do with old device backups that are no longer needed.

Of course you don’t want to delete the only copy of a device backup you have, so be sure you have a backup of the iPhone or iPad somewhere before deleting one from the Mac.

As a bonus, you’ll still have these backups safe and sound if you’re using Time Machine, assuming you use that feature to backup the entire Mac anyway. You can then go about restoring the backup if you still need it, depending on how much time has passed and how long Time Machine keeps files around. Another handy trick for redundant backups is to manually copy a copy of the backed up devices to other external storage mediums, like an SD card, USB flash drive, or external hard drive, which you can then refer to if needed.

Using a Mac is just one way of backing up your iPhone or iPad. You can also use a Windows PC with iTunes if you want to. If you’d rather not have to plug them into a computer at all, you can use iCloud for backups instead as well. With iCloud, your device will back itself up overnight and you won’t need to connect to a computer to restore anything, either. And just like the Mac and iTunes approaches, you can also delete backups from iCloud too.

Finder in MacOS handles all device management now that iTunes used to, and that includes not only device backups but also syncing music to iPhone or iPad in MacOS with the Finder too, along with other device management options. Basically all that used to be device management in iTunes is now in Finder. – https://is.gd/uKwvXv

❤ How to Restore Lost Safari Bookmarks with iCloud on iPhone , iPad and Mac


Have you deleted or lost Safari bookmarks from iPhone, iPad, or Mac somehow? If so you can use a procedure we’ll outline here to restore and recover lost Safari bookmarks back to your device.

Most iPhone and iPad owners make use of Safari to browse the web, and creating bookmarks of favorite sites (like SydneyCBD.repair of course) is a common procedure. Since it’s the web browser that comes pre-installed on iOS and iPadOS, Safari works seamlessly with other devices in the Apple ecosystem, and iCloud can help sync your bookmarks too.

Bookmarks, History, and other data are synced automatically across your devices as long as iCloud is enabled, so regardless of whether you’re browsing on your iPhone, iPad, or a MacBook, all your Safari data is readily available. However, it’s always possible to to accidentally delete a bookmark, or have some other action occur where you lose your Safari bookmarks.

Did you lose your bookmarks in Safari for whatever reason? Perhaps after an accident, a corrupted iOS update, some other error on the device? If so, look no further. Thanks to Apple’s iCloud service, it’s fairly easy to restore your lost Safari bookmarks data. In this article, we’ll be discussing how you can recover all your lost Safari bookmarks using iCloud using a process similar to restoring lost contacts with iCloud, restoring lost Calendars and Reminders with iCloud, and recovering lost iCloud Drive documents and files.


How to Recover Lost Safari Bookmarks with iCloud


By default, iCloud backup is enabled on all Apple devices, so restoring your bookmarks shouldn’t be a tedious process. However, if you ever manually disabled backups at some point for whatever reason, this procedure will not help you recover your lost Safari bookmarks data.


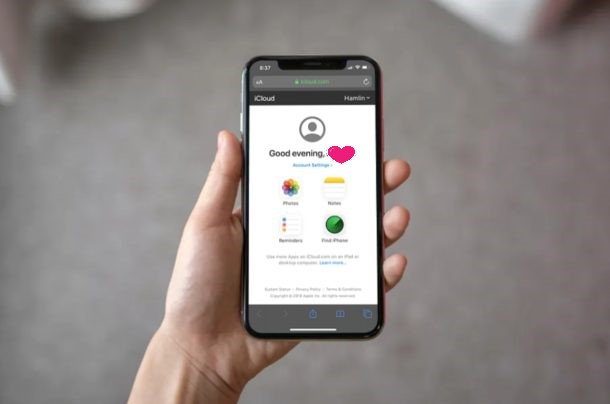
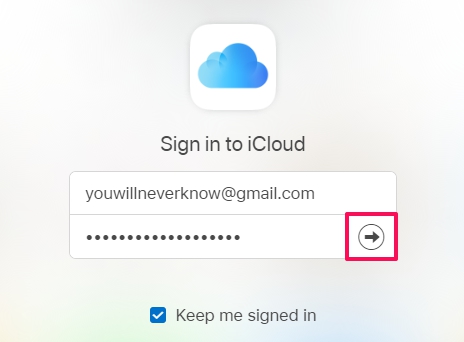
  • Open any web browser like Chrome, Safari, Firefox, etc. from your PC, Mac, or iPad and head over to iCloud.com. Sign in to iCloud by clicking on the “arrow icon” once you’ve typed in your Apple ID and password.


How to Restore Lost Safari Bookmarks with iCloud


  • Click on “Account Settings” once you’re in the iCloud homepage.


  • Here, just click on “Restore Bookmarks” under the Advanced section located at the bottom of the page, as shown in the screenshot below.


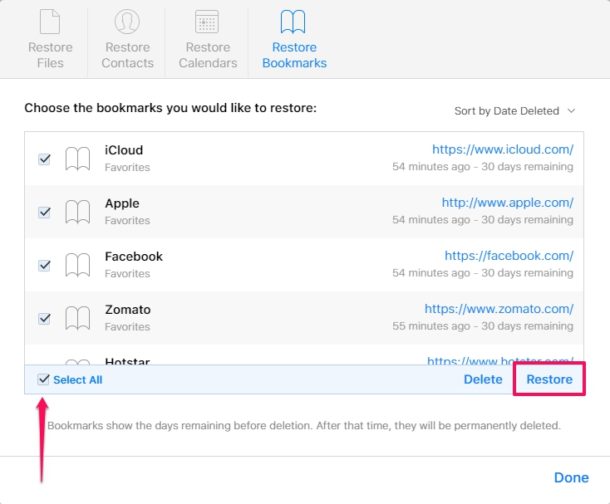
  • You’ll get a new pop-up window where iCloud will start searching for the Safari bookmarks that are stored on the cloud. Wait for a few seconds. Once the search is complete, you’ll get a list of all the bookmarks that can be restored. Simply select the bookmarks which you want to recover by checking the boxes and click on “Restore” as shown in the screenshot below.


How to Restore Lost Safari Bookmarks with iCloud


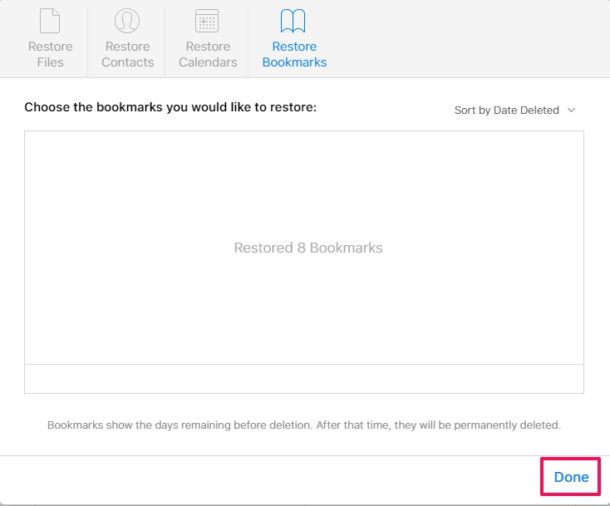
  • The restoration process will take a few seconds to finish. Once it’s done, the window will display how many bookmarks were restored in the process. Click “Done” to close this window and end the procedure.


How to Restore Lost Safari Bookmarks with iCloud


Those are the steps required to recover and restore your lost Safari bookmarks.

This recovered data will be accessible immediately across all your supported Apple devices, as long as they’re logged into the same iCloud account, which is one of the many reasons you must use the same Apple ID on all of your own personal devices.

To use the data recovery features available on iCloud.com, you need to use the iCloud.com desktop site, meaning you can use an iPad or computer that features a desktop-class web browser. You can also use this trick to access and login to iCloud.com from iPhone with full access by requesting the desktop site. If you’re trying to perform this restoration process on your iPhone’s mobile browser without requesting the desktop site, you’re out of luck. It’d be reasonable to expect Apple to add this functionality to mobile devices at some point down the line however, so that limitation may change in the future..

By default, Apple provides 5 GB of free cloud storage with every iCloud account. As long as you’re not backing up tons of files and photos, this should be adequate to store most of basic stuff like bookmarks, documents, files, contacts, calendars, and other data on Apple’s cloud servers. If you do need to update to a larger iCloud storage capacity, they’re available at monthly costs of $0.99, $2.99 and $9.99 for 50 GB, 200 GB and 2 TB storage space respectively.

For the majority of users, you’ll want to have iCloud backups enabled, so unless you have serious privacy concerns or some other compelling reason it may be a good idea to shell out for an iCloud paid plan if needed to backup your devices.

The convenience that iCloud brings to the table and how it works seamlessly across iOS and macOS devices is simply unmatched. Users don’t have to heavily rely on physical storage anymore, as valuable information like contacts, photos, files, etc. are automatically backed up to the cloud when their devices are turned on and connected to power. You can always manage your iCloud backups too from the devices, if you need to delete an iCloud backup from iPhone or iPad for example to make space for a fresh backup. – https://is.gd/4Et2zK

❤ How to Disable Launchpad on Mac

How to turn off Launchpad on Mac


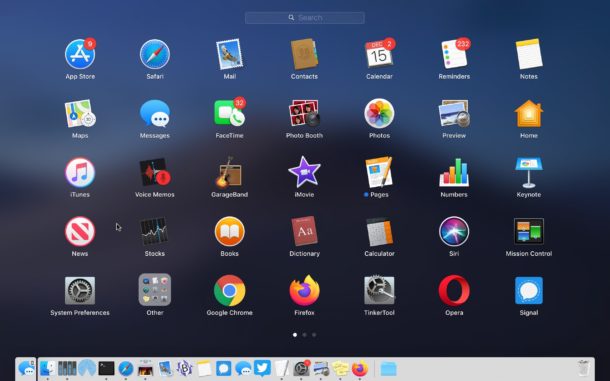
Interested in disabling Launchpad on Mac? If you want to turn off the Launchpad for whatever reason or to stop accidentally opening Launchpad in MacOS, you can turn the feature off completely.

For some quick background, Launchpad is a feature in MacOS that reveals a screen of app icons, sort of reminiscent to the appearance of an iPad or iPhone. Launchpad can be accessed by gesture, F button, or by opening the Launchpad app from the Dock or Applications folder. Some users may find this feature to be really helpful, whereas others may find it to be less useful particularly if they’re accessing Launchpad through an accidental pinch gesture on trackpad, or tapping on the F4 key, or clicking the app Dock icon.

This article will show how to disable the Launchpad gesture, remove the Launchpad Dock icon, and disable remove the Launchpad F button trigger on Mac to turn Launchpad off.


How to Disable Launchpad Gesture on Mac


This applies to turning off the Launchpad gesture on all Macs using a Trackpad :

  • Pull down the  Apple menu and go to “System Preferences”
  • Choose “Trackpad” then choose “More Gestures”
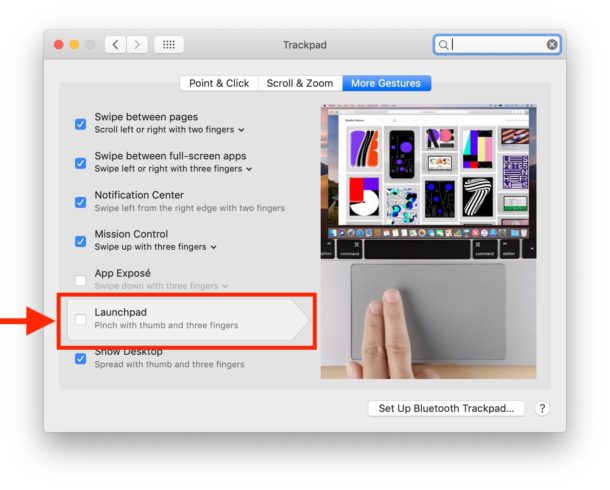
  • Locate “Launchpad” in the list of gestures and uncheck the box next to “Launchpad” to disable the Launchpad pinch gesture on Mac


How to disable Launchpad gesture on Mac


  • Close System Preferences


That will disable the Launchpad pinch gesture.

You may also want to remove the Launchpad app icon from the Mac Dock.


How to Remove Launchpad from Mac Dock


  • Click and hold on the Launchpad icon, then drag it out of the dock and wait a moment for the ‘Remove’ label to appear, then drop the Launchpad icon


That will remove Launchpad from the Dock on the Mac.

Finally, you may be interested in changing or removing the keyboard shortcut for Launchpad on the Mac.


How to Change or Remove Launchpad Keyboard Shortcut on Mac


  • Pull down the  Apple menu and go to “System Preferences”
  • Go to “Keyboards” and then to “Shortcuts” and choose “Launchpad & Dock”
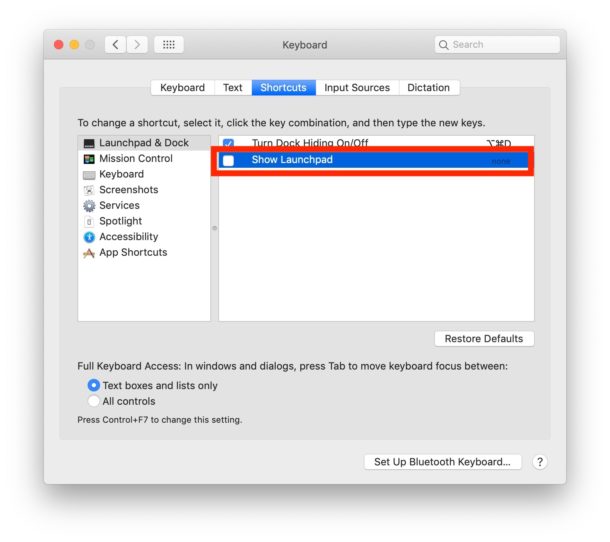
  • Uncheck the box for “Show Launchpad” to disable it, otherwise click the keyboard shortcut to set it to something else


How to disable Launchpad keyboard shortcut on Mac


This process should be familiar to anyone who has set a custom keyboard shortcut on Mac except that rather than creating a new one you’re either disabling or changing an existing keystroke combination.

Obviously this is geared towards disabling Launchpad, but if you don’t want to turn off the feature and you instead enjoy it, then there are plenty of Launchpad tips we’ve discussed before to browse through. – https://is.gd/0AxUuD

❤ 5 Great Tips for Working on a Mac at Night or in Low Light

Tips for Using Mac at Night


Are you a night time Mac user? Many of us are, and MacOS has a lot of great features that can improve low light computing experiences.

Whether you’re working in the dim evening or late at night, or even just in a dark room, we’ll share with you some helpful tips to make low-light Mac usage even better. Perhaps you’ll find these tricks will help you to reduce eye strain and might even make you more productive as a result!

Note that some of these features are limited to MacOS Mojave 10.14 and later, like the full Dark Mode theme, but the same general principles will apply to other Mac OS versions as well.


1: Manually Reduce Screen Brightness


Many of the Mac displays are extremely bright, which looks brilliant and allows for vibrant colors and screen imagery, but at night or in low light you’ll probably want to reduce that screen brightness considerably.

You can use the keyboard brightness controls, or adjust brightness through the Display preference panel on Mac.


Lower Screen Brightness


Another great benefit to reducing screen brightness is for Mac laptops, where you’ll almost certainly notice a significant boost to battery life while the screen is more dimmed.

2: Use Night Shift for a Warmer Screen Hue

Night Shift is the great feature that warms the display colors of a Mac during the evening and night time hours, so that the screen is putting off less blue light. There are many proven benefits to reducing blue light exposure, and you might even notice less eye strain when using Night Shift too.

Enabling Night Shift on Mac is done through the Display preference panel, setting it on a schedule or to match the daytime and nighttime hours is an easy way to appreciate the app as it sets in automatically. Generally speaking, the warmest setting offers the best results for most users.


Use Night Shift for warmer display hue


For Macs without Night Shift support, you can also use Flux for a similar effect

3: Use Dark Mode to Reduce Bright Interface Elements

Dark Mode takes all of the bright white and bright gray user interface elements on a Mac and makes them dark gray, which is perfect for working at night and in low light situations. Enabling Dark Mode on the Mac is simply done through the “General” preference panel in MacOS.

Currently you have to manually enable and disable Dark Mode when you want to use it, but perhaps a future version of MacOS will allow for automatic Dark Mode similar to how Night Shift and Dynamic Desktops works.


Enable Dark Mode theme on Mac OS


For Mac users who don’t have the full Dark Mode theme, earlier versions of Mac OS allow for enabling a Dark menu bar and Dock instead.

4: Use Dark Wallpapers or Dynamic Desktops

Dynamic Desktop automatically changes the wallpaper with the time of day, using a darker picture in the evening and night hours. This helps to reduce the brightness coming off the display, making it easier on the eyes to stare at a screen. It also looks great.

Dynamic Desktops are enabled in the Desktop & Screen Saver preference panel.


Using Dark wallpapers or Dynamic Desktops


If you don’t have or like Dynamic Desktops, then just setting a dark wallpaper can offer the same effect of reducing the amount of brightness coming off the display.

5: Browsing the Web? Use Safari Reader Mode

Safari Reader Mode is excellent for many reasons, but if you’re browsing the web or reading the web at night, placing an article into Safari Reader is fantastic because you can theme Reader so that it matches Dark Mode on the Mac, taking black on white text and turning it into white on dark gray or white on black.

Enabling Reader Mode in Safari is just a matter of clicking the Reader button in the URL bar of a web page, and then you can click the “aA” button to customize the appearance of Safari Reader on Mac as well including changing color scheme, fonts, and text size (using larger text at night is easier on the eyes for many of us).


Dark Reader mode in Safari


Oh and if you’re on the web using YouTube, you can try YouTube dark mode theme too.

Unrelated to working at night, but another fantastic Safari Reader tip is for printing an articles content only, without ads or other page content that can use unnecessary printer ink. – https://is.gd/N0mu0W